Customers / End-Users
Track spend, set budgets and permissions for your customers.
Tracking Customer Spend + Permissions
1. Make LLM API call w/ Customer ID
LiteLLM checks for a customer/end-user ID in the following order (first match wins):
| Priority | Method | Where | Notes |
|---|---|---|---|
| 1 | x-litellm-customer-id header | Request headers | Standard header, always checked |
| 2 | x-litellm-end-user-id header | Request headers | Standard header, always checked |
| 3 | Custom header via user_header_mappings | Request headers | Configured in general_settings |
| 4 | Custom header via user_header_name | Request headers | Deprecated — use user_header_mappings |
| 5 | user field | Request body | Standard OpenAI field |
| 6 | litellm_metadata.user field | Request body | Anthropic-style metadata |
| 7 | metadata.user_id field | Request body | Generic metadata pattern |
| 8 | safety_identifier field | Request body | Responses API |
If JWT auth is enabled with end_user_id_jwt_field, the customer ID from the verified JWT claim takes precedence over all headers and body fields listed above. The request-supplied fields are only used when the JWT does not yield an end-user ID. Since the claim comes from a token LiteLLM has already validated, callers cannot override it with x-litellm-end-user-id, metadata.user_id, etc.
Option 1: Standard headers (recommended, no request body modification needed)
curl -X POST 'http://0.0.0.0:4000/chat/completions' \
        --header 'Content-Type: application/json' \
        --header "Authorization: Bearer $LITELLM_API_KEY" \
        --header 'x-litellm-end-user-id: ishaan3' \
        --data '{
        "model": "azure-gpt-3.5",
        "messages": [{"role": "user", "content": "what time is it"}]
        }'
Both x-litellm-customer-id and x-litellm-end-user-id are supported and always checked without any configuration.
Option 2: user field in request body (OpenAI-compatible)
curl -X POST 'http://0.0.0.0:4000/chat/completions' \
        --header 'Content-Type: application/json' \
        --header "Authorization: Bearer $LITELLM_API_KEY" \
        --data '{
        "model": "azure-gpt-3.5",
        "user": "ishaan3",
        "messages": [{"role": "user", "content": "what time is it"}]
        }'
Option 3: Custom header via user_header_mappings (configurable)
general_settings:
  user_header_mappings:
    - header_name: "x-my-app-user-id"
      litellm_user_role: "customer"
curl -X POST 'http://0.0.0.0:4000/chat/completions' \
        --header 'Content-Type: application/json' \
        --header "Authorization: Bearer $LITELLM_API_KEY" \
        --header 'x-my-app-user-id: ishaan3' \
        --data '{
        "model": "azure-gpt-3.5",
        "messages": [{"role": "user", "content": "what time is it"}]
        }'
Option 4: litellm_metadata.user (Anthropic-style)
curl -X POST 'http://0.0.0.0:4000/chat/completions' \
        --header 'Content-Type: application/json' \
        --header "Authorization: Bearer $LITELLM_API_KEY" \
        --data '{
        "model": "claude-sonnet-5",
        "messages": [{"role": "user", "content": "what time is it"}],
        "litellm_metadata": {"user": "ishaan3"}
        }'
Option 5: metadata.user_id
curl -X POST 'http://0.0.0.0:4000/chat/completions' \
        --header 'Content-Type: application/json' \
        --header "Authorization: Bearer $LITELLM_API_KEY" \
        --data '{
        "model": "azure-gpt-3.5",
        "messages": [{"role": "user", "content": "what time is it"}],
        "metadata": {"user_id": "ishaan3"}
        }'
The customer_id will be upserted into the DB with the new spend.
If the customer_id already exists, spend will be incremented.
2. Get Customer Spend
- All-up spend
- Event Webhook
Call /customer/info to get a customer's all up spend
# end_user_id: 👈 CUSTOMER ID
# Authorization: 👈 YOUR PROXY KEY
curl -X GET 'http://0.0.0.0:4000/customer/info?end_user_id=ishaan3' \
        -H "Authorization: Bearer $LITELLM_API_KEY"
Expected Response:
{
    "user_id": "ishaan3",
    "blocked": false,
    "alias": null,
    "spend": 0.001413,
    "allowed_model_region": null,
    "default_model": null,
    "litellm_budget_table": null
}
To update spend in your client-side DB, point the proxy to your webhook.
E.g. if your server is https://webhook.site and your listening on 6ab090e8-c55f-4a23-b075-3209f5c57906
- Add webhook url to your proxy environment:
export WEBHOOK_URL="https://webhook.site/6ab090e8-c55f-4a23-b075-3209f5c57906"
- Add 'webhook' to config.yaml
general_settings:
  alerting: ["webhook"] # 👈 KEY CHANGE
- Test it!
curl -X POST 'http://localhost:4000/chat/completions' \
-H 'Content-Type: application/json' \
-H "Authorization: Bearer $LITELLM_API_KEY" \
-D '{
    "model": "mistral",
    "messages": [
        {
        "role": "user",
        "content": "What's the weather like in Boston today?"
        }
    ],
    "user": "krrish12"
}
'
Expected Response
{
  "spend": 0.0011120000000000001, # 👈 SPEND
  "max_budget": null,
  "token": "example-api-key-123",
  "customer_id": "krrish12",  # 👈 CUSTOMER ID
  "user_id": null,
  "team_id": null,
  "user_email": null,
  "key_alias": null,
  "projected_exceeded_date": null,
  "projected_spend": null,
  "event": "spend_tracked",
  "event_group": "customer",
  "event_message": "Customer spend tracked. Customer=krrish12, spend=0.0011120000000000001"
}
Restricting Which IDs Become Customers
Every distinct customer ID LiteLLM sees is upserted into the customer table, which becomes a problem when a client sends a per-session identifier. Claude Code, for example, puts a JSON blob in metadata.user_id:
{"device_id": "4ec41ed1...", "account_uuid": "...", "session_id": "..."}
Each session then lands in Usage -> Customer Usage as its own customer, and if you have a default customer budget configured, each session gets its own copy of that budget, so a monthly cap meant for real customers turns into a per-session cap on that traffic.
Set validate_end_user_id_in_db to keep those IDs out. Available in v1.87.0 and above.
litellm_settings:
  validate_end_user_id_in_db: true
An ID is then accepted only when it matches an existing customer's user_id, an internal user's user_id, or an internal user's email. IDs shaped like a JSON object or array are dropped before any database lookup, since those are never real customer identifiers. Dropping is not an error: the request still succeeds, it just carries no customer, and its spend is attributed to the virtual key, team and internal user as usual. Lookups are cached for 5 minutes when the ID resolved and 1 minute when it did not, so a newly created customer can take up to a minute to be recognized.
Keeping a default budget for unregistered customers
On its own, validate_end_user_id_in_db drops every ID with no matching row, which works against max_end_user_budget_id if you rely on that to cap customers you never explicitly created. Set both and the two cooperate: JSON-shaped IDs are still dropped, while a plain-string ID with no row is preserved so the default budget still applies to it.
litellm_settings:
  validate_end_user_id_in_db: true
  max_end_user_budget_id: "your_default_budget_id"
Bucketing internal traffic under one customer
If you would rather label that traffic than drop it, have the client send x-litellm-customer-id. Headers are checked before any request body field, so the header wins over whatever the client puts in metadata.user_id, and Claude Code can set it through ANTHROPIC_CUSTOM_HEADERS with no other change, while Codex CLI does the same through http_headers in its config.toml. See Claude Code granular cost tracking and Codex CLI granular cost tracking.
Create that customer through /customer/new with its own budget. That satisfies validate_end_user_id_in_db, and an explicit customer budget takes precedence over the default one, so internal traffic can carry a different limit than your real customers.
Restricting Which Models a Customer Can Use
Set models on a customer to limit which models requests made on its behalf can call. A request that carries this customer's ID, through the user field or the x-litellm-customer-id header, is rejected with a 403 when the requested model is not in the list, even if the virtual key and team allow it. An empty or missing list means the customer adds no model restriction. The customer list only narrows access: the key's and team's own model restrictions still apply on top, so listing a model on the customer never grants a key access to it
Entries follow the same rules as key and team models, so a wildcard such as anthropic/* or a model access group name works here too
Client-supplied fallbacks are checked against the customer's list too, as are router fallbacks when enforce_fallback_model_access is enabled
curl -L -X POST 'http://localhost:4000/customer/new' \
-H "Authorization: Bearer $LITELLM_API_KEY" \
-H 'Content-Type: application/json' \
-d '{
    "user_id": "user_1",
    "models": ["gpt-5.6-luna"]
  }'
A request for any other model on behalf of user_1 then fails with the same error shape as key and team model checks, with type set to customer_model_access_denied
curl -L -X POST 'http://localhost:4000/v1/chat/completions' \
-H "Authorization: Bearer $LITELLM_API_KEY" \
-H 'Content-Type: application/json' \
-H 'x-litellm-customer-id: user_1' \
-d '{
    "model": "gpt-5.6-terra",
    "messages": [{"role": "user", "content": "hi"}]
  }'
{
  "error": {
    "message": "The requested model 'gpt-5.6-terra' is not in the allowed models for this customer. Check the models this customer can use and try again.",
    "type": "customer_model_access_denied",
    "param": "model",
    "code": "403"
  }
}
Change the list with /customer/update. Omitting models leaves the current list untouched, and sending "models": [] removes the restriction. /customer/info returns the current list in its models field
curl -L -X POST 'http://localhost:4000/customer/update' \
-H "Authorization: Bearer $LITELLM_API_KEY" \
-H 'Content-Type: application/json' \
-d '{
    "user_id": "user_1",
    "models": []
  }'
Setting Customer Object Permissions
Control which resources (MCP servers, vector stores, agents) a customer can access.
What are Object Permissions?
Object permissions allow you to restrict customer access to specific:
- MCP Servers: Limit which MCP servers the customer can call
- MCP Access Groups: Assign customers to predefined groups of MCP servers
- MCP Tool Permissions: Granular control over which tools within an MCP server the customer can use
- Vector Stores: Control which vector stores the customer can query
- Agents: Restrict which agents the customer can interact with
- Agent Access Groups: Assign customers to predefined groups of agents
Creating a Customer with Object Permissions
curl -L -X POST 'http://localhost:4000/customer/new' \
-H "Authorization: Bearer $LITELLM_API_KEY" \
-H 'Content-Type: application/json' \
-d '{
    "user_id": "user_1",
    "object_permission": {
      "mcp_servers": ["server_1", "server_2"],
      "mcp_access_groups": ["public_group"],
      "mcp_tool_permissions": {
        "server_1": ["tool_a", "tool_b"]
      },
      "vector_stores": ["vector_store_1"],
      "agents": ["agent_1"],
      "agent_access_groups": ["basic_agents"]
    }
  }'
Parameters:
mcp_servers(Optional[List[str]]): List of allowed MCP server IDsmcp_access_groups(Optional[List[str]]): List of MCP access group namesmcp_tool_permissions(Optional[Dict[str, List[str]]]): Map of server ID to allowed tool namesvector_stores(Optional[List[str]]): List of allowed vector store IDsagents(Optional[List[str]]): List of allowed agent IDsagent_access_groups(Optional[List[str]]): List of agent access group names
Note: If object_permission is null or {}, the customer has no object-level restrictions.
Updating Customer Object Permissions
You can update object permissions for existing customers:
curl -L -X POST 'http://localhost:4000/customer/update' \
-H "Authorization: Bearer $LITELLM_API_KEY" \
-H 'Content-Type: application/json' \
-d '{
    "user_id": "user_1",
    "object_permission": {
      "mcp_servers": ["server_3"],
      "vector_stores": ["vector_store_2", "vector_store_3"]
    }
  }'
Viewing Customer Object Permissions
When you query customer info, object permissions are included in the response:
curl -X GET 'http://0.0.0.0:4000/customer/info?end_user_id=user_1' \
    -H "Authorization: Bearer $LITELLM_API_KEY"
Response:
{
  "user_id": "user_1",
  "blocked": false,
  "alias": "John Doe",
  "spend": 0.0,
  "object_permission": {
    "object_permission_id": "perm_abc123",
    "mcp_servers": ["server_1", "server_2"],
    "mcp_access_groups": ["public_group"],
    "mcp_tool_permissions": {
      "server_1": ["tool_a", "tool_b"]
    },
    "vector_stores": ["vector_store_1"],
    "agents": ["agent_1"],
    "agent_access_groups": ["basic_agents"]
  },
  "litellm_budget_table": null
}
Use Cases
1. Tiered Access Control Create different permission tiers for your customers:
# Free tier - limited access
curl -L -X POST 'http://localhost:4000/customer/new' \
-H "Authorization: Bearer $LITELLM_API_KEY" \
-H 'Content-Type: application/json' \
-d '{
    "user_id": "free_user",
    "budget_id": "free_tier",
    "object_permission": {
      "mcp_access_groups": ["public_group"],
      "agent_access_groups": ["basic_agents"]
    }
  }'
# Premium tier - full access
curl -L -X POST 'http://localhost:4000/customer/new' \
-H "Authorization: Bearer $LITELLM_API_KEY" \
-H 'Content-Type: application/json' \
-d '{
    "user_id": "premium_user",
    "budget_id": "premium_tier",
    "object_permission": {
      "mcp_servers": ["server_1", "server_2", "server_3"],
      "vector_stores": ["vector_store_1", "vector_store_2"],
      "agents": ["agent_1", "agent_2", "agent_3"]
    }
  }'
2. Department-Specific Access Restrict customers to resources relevant to their department:
curl -L -X POST 'http://localhost:4000/customer/new' \
-H "Authorization: Bearer $LITELLM_API_KEY" \
-H 'Content-Type: application/json' \
-d '{
    "user_id": "sales_user",
    "object_permission": {
      "mcp_servers": ["crm_server", "email_server"],
      "agents": ["sales_assistant"],
      "vector_stores": ["sales_knowledge_base"]
    }
  }'
3. Tool-Level Restrictions Grant access to specific tools within an MCP server:
curl -L -X POST 'http://localhost:4000/customer/new' \
-H "Authorization: Bearer $LITELLM_API_KEY" \
-H 'Content-Type: application/json' \
-d '{
    "user_id": "restricted_user",
    "object_permission": {
      "mcp_servers": ["database_server"],
      "mcp_tool_permissions": {
        "database_server": ["read_only_query", "get_table_schema"]
      }
    }
  }'
Setting Customer Budgets
Set customer budgets (e.g. monthly budgets, tpm/rpm limits) on LiteLLM Proxy
Default Budget for All Customers
Apply budget limits to all customers without explicit budgets. This is useful for rate limiting and spending controls across all end users.
Step 1: Create a default budget
curl -X POST 'http://localhost:4000/budget/new' \
-H 'Content-Type: application/json' \
-H "Authorization: Bearer $LITELLM_API_KEY" \
-d '{
    "max_budget": 10,
    "rpm_limit": 2,
    "tpm_limit": 1000
}'
Step 2: Configure the default budget ID
litellm_settings:
  max_end_user_budget_id: "budget_id_from_step_1"
Step 3: Test it
curl -X POST 'http://localhost:4000/chat/completions' \
-H 'Content-Type: application/json' \
-H "Authorization: Bearer $LITELLM_API_KEY" \
-d '{
    "model": "gpt-5.6-luna",
    "messages": [{"role": "user", "content": "Hello"}],
    "user": "my-customer-id"
}'
The customer will be subject to the default budget limits (RPM, TPM, and $ budget). Customers with explicit budgets are unaffected, and the default also applies to customers that don't exist in the database yet. LiteLLM caches the budget object for 60 seconds, so edits to it take up to a minute to apply.
The float setting max_end_user_budget is no longer enforced; if you have it in your config, replace it with max_end_user_budget_id as shown above.
The default applies to every ID that reaches customer tracking, including per-session IDs sent by agent clients. See Restricting Which IDs Become Customers if you want those kept out of the customer table while real customers keep the default budget.
Quick Start
Create / Update a customer with budget
Create New Customer w/ budget
curl -X POST 'http://0.0.0.0:4000/customer/new'
    -H "Authorization: Bearer $LITELLM_API_KEY"
    -H 'Content-Type: application/json'
    -d '{
        "user_id" : "my-customer-id",
        "max_budget": 10
    }'
/customer/new accepts budget fields inline: max_budget, soft_budget, budget_duration, tpm_limit, rpm_limit, max_parallel_requests and model_max_budget. Set either max_budget or budget_id, not both; passing both is rejected. Customer tpm_limit and rpm_limit are stored on a budget object, so they only apply when the customer is linked to one, either inline as above or through budget_id.
/customer/update accepts a narrower set of fields: user_id, alias, blocked, max_budget, budget_id, allowed_model_region, default_model and object_permission. Anything else, including tpm_limit, rpm_limit and budget_duration, is silently dropped; to change those, update the budget object with /budget/update instead.
Customer budgets are global per deployment. Spend is tracked against the customer id alone, so the same customer shares one budget across every virtual key and team, and a customer budget can't be scoped to a single key or team.
Test it!
curl -X POST 'http://localhost:4000/chat/completions' \
-H 'Content-Type: application/json' \
-H "Authorization: Bearer $LITELLM_API_KEY" \
-D '{
    "model": "mistral",
    "messages": [
        {
        "role": "user",
        "content": "What'\''s the weather like in Boston today?"
        }
    ],
    "user": "ishaan-jaff-48"
}
Assign Pricing Tiers
Create and assign customers to pricing tiers.
1. Create a budget
- UI
- API
- Go to the 'Budgets' tab on the UI.
- Click on '+ Create Budget'.
- Create your pricing tier (e.g. 'my-free-tier' with budget $4). This means each user on this pricing tier will have a max budget of $4.
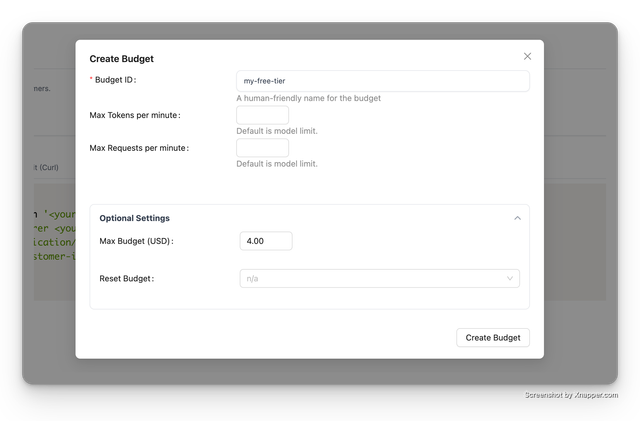
Use the /budget/new endpoint for creating a new budget. API Reference
curl -X POST 'http://localhost:4000/budget/new' \
-H 'Content-Type: application/json' \
-H "Authorization: Bearer $LITELLM_API_KEY" \
-D '{
    "budget_id": "my-free-tier",
    "max_budget": 4
}
tpm_limit and rpm_limit are optional on a budget. Leaving them unset stores null and LiteLLM enforces no per-customer TPM or RPM limit for customers on that budget; only your provider's own rate limits apply. Set them only when you want LiteLLM to cap the customer
curl -X POST 'http://localhost:4000/budget/info' \
  -H "Authorization: Bearer $LITELLM_MASTER_KEY" \
  -H 'Content-Type: application/json' \
  -d '{"budgets": ["my-free-tier"]}'
tpm_limit and rpm_limit come back as null when no LiteLLM limit is set
2. Assign Budget to Customer
In your application code, assign budget when creating a new customer.
Just use the budget_id used when creating the budget. In our example, this is my-free-tier.
curl -X POST 'http://localhost:4000/customer/new' \
-H 'Content-Type: application/json' \
-H "Authorization: Bearer $LITELLM_API_KEY" \
-D '{
    "user_id": "my-customer-id",
    "budget_id": "my-free-tier" # 👈 KEY CHANGE
}
3. Test it!
- curl
- OpenAI
curl -X POST 'http://localhost:4000/customer/new' \
-H 'Content-Type: application/json' \
-H "Authorization: Bearer $LITELLM_API_KEY" \
-D '{
    "user_id": "my-customer-id",
    "budget_id": "my-free-tier" # 👈 KEY CHANGE
}
from openai import OpenAI
client = OpenAI(
  base_url="<your_proxy_base_url>",
  api_key="<your_proxy_key>"
)

completion = client.chat.completions.create(
  model="gpt-5.6-luna",
  messages=[
    {"role": "system", "content": "You are a helpful assistant."},
    {"role": "user", "content": "Hello!"}
  ],
  user="my-customer-id"
)

print(completion.choices[0].message)