Hashicorp Vault
| Feature | Support | Description |
|---|---|---|
| Reading Secrets | ✅ | Read secrets e.g OPENAI_API_KEY |
| Writing Secrets | ✅ | Store secrets e.g Virtual Keys |
| Authentication Methods to Hashicorp Vault | ✅ | AppRole, TLS Certificate, Token |
Read secrets from Hashicorp Vault
Step 1. Add Hashicorp Vault details in your environment
LiteLLM supports three methods of authentication:
- AppRole authentication (recommended) -
HCP_VAULT_APPROLE_ROLE_IDandHCP_VAULT_APPROLE_SECRET_ID - TLS cert authentication -
HCP_VAULT_CLIENT_CERTandHCP_VAULT_CLIENT_KEY - Token authentication -
HCP_VAULT_TOKEN
HCP_VAULT_ADDR="https://test-cluster-public-vault-0f98180c.e98296b2.z1.hashicorp.cloud:8200"
HCP_VAULT_NAMESPACE="admin"

# Authentication via AppRole (recommended)
HCP_VAULT_APPROLE_ROLE_ID="your-role-id"
HCP_VAULT_APPROLE_SECRET_ID="your-secret-id"
HCP_VAULT_APPROLE_MOUNT_PATH="approle" # OPTIONAL. defaults to "approle"

# OR - Authentication via TLS cert
HCP_VAULT_CLIENT_CERT="path/to/client.pem"
HCP_VAULT_CLIENT_KEY="path/to/client.key"

# OR - Authentication via token
HCP_VAULT_TOKEN="hvs.CAESIG52gL6ljBSdmq*****"


# OPTIONAL
HCP_VAULT_REFRESH_INTERVAL="86400" # defaults to 86400, frequency of cache refresh for Hashicorp Vault
HCP_VAULT_MOUNT_NAME="secret" # OPTIONAL. defaults to "secret", set this if your KV engine is mounted elsewhere
HCP_VAULT_PATH_PREFIX="litellm" # OPTIONAL. defaults to None, set this if your secrets live under a custom prefix like secret/data/litellm/OPENAI_API_KEY
Step 2. Add to proxy config.yaml
general_settings:
  key_management_system: "hashicorp_vault"

  # [OPTIONAL SETTINGS]
  key_management_settings:
    store_virtual_keys: true # OPTIONAL. Defaults to False, when True will store virtual keys in secret manager
    prefix_for_stored_virtual_keys: "litellm/" # OPTIONAL. If set, this prefix will be used for stored virtual keys in the secret manager
    access_mode: "read_and_write" # Literal["read_only", "write_only", "read_and_write"]
Step 3. Start + test proxy
$ litellm --config /path/to/config.yaml
Authentication Methods
LiteLLM supports three authentication methods for Hashicorp Vault, with the following priority:
- AppRole - Recommended for production applications
- TLS Certificate - For certificate-based authentication
- Token - Direct token authentication
1. AppRole Authentication
To set up AppRole authentication:
- Enable AppRole auth in Vault:
vault auth enable approle
- Create a policy and role for LiteLLM:
# Create a policy file (litellm-policy.hcl)
path "secret/data/*" {
  capabilities = ["create", "read", "update", "delete", "list"]
}

# Apply the policy
vault policy write litellm-policy litellm-policy.hcl

# Create an AppRole
vault write auth/approle/role/litellm \
    token_policies="litellm-policy" \
    token_ttl=32d \
    token_max_ttl=32d
- Get your Role ID and Secret ID:
# Get Role ID
vault read auth/approle/role/litellm/role-id

# Generate Secret ID
vault write -f auth/approle/role/litellm/secret-id
- Set the environment variables:
export HCP_VAULT_APPROLE_ROLE_ID="your-role-id"
export HCP_VAULT_APPROLE_SECRET_ID="your-secret-id"
2. TLS Certificate Authentication
TLS Certificate authentication uses client certificates for mutual TLS authentication with Vault.
Environment Variables:
export HCP_VAULT_CLIENT_CERT="path/to/client.pem"
export HCP_VAULT_CLIENT_KEY="path/to/client.key"
export HCP_VAULT_CERT_ROLE="your-cert-role"  # Optional
How it works:
- LiteLLM uses the client certificate and key for mutual TLS authentication
- Vault validates the certificate and issues a temporary token
- The token is cached for the duration of its lease
3. Token Authentication
Direct token authentication uses a static Vault token.
Environment Variables:
export HCP_VAULT_TOKEN="hvs.CAESIG52gL6ljBSdmq*****"
How it works
Reading Secrets
LiteLLM reads secrets from Hashicorp Vault's KV v2 engine using the following URL format:
{VAULT_ADDR}/v1/{NAMESPACE}/{MOUNT_NAME}/data/{PATH_PREFIX}/{SECRET_NAME}
For example, if you have:
HCP_VAULT_ADDR="https://vault.example.com:8200"HCP_VAULT_NAMESPACE="admin"HCP_VAULT_MOUNT_NAME="secret"HCP_VAULT_PATH_PREFIX="litellm"- Secret name:
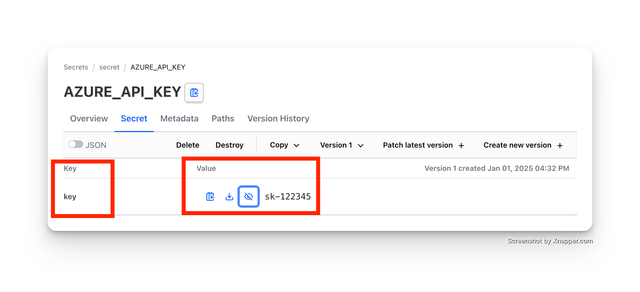
AZURE_API_KEY
LiteLLM will look up:
https://vault.example.com:8200/v1/admin/secret/data/litellm/AZURE_API_KEY
Expected Secret Format
LiteLLM expects all secrets to be stored as a JSON object with a key field containing the secret value.
For example, for AZURE_API_KEY, the secret should be stored as:
{
  "key": "sk-1234"
}
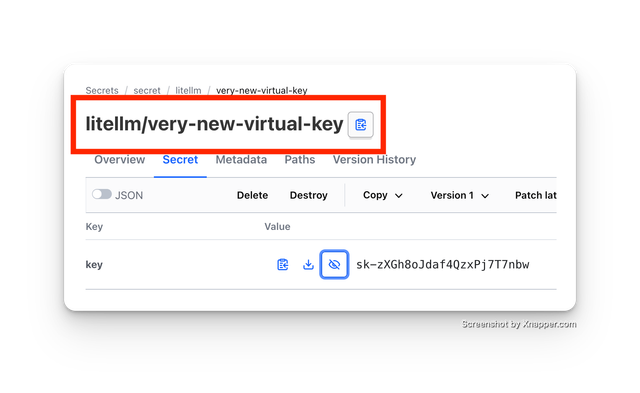
Writing Secrets
When a Virtual Key is Created / Deleted on LiteLLM, LiteLLM will automatically create / delete the secret in Hashicorp Vault.
- Create Virtual Key on LiteLLM either through the LiteLLM Admin UI or API
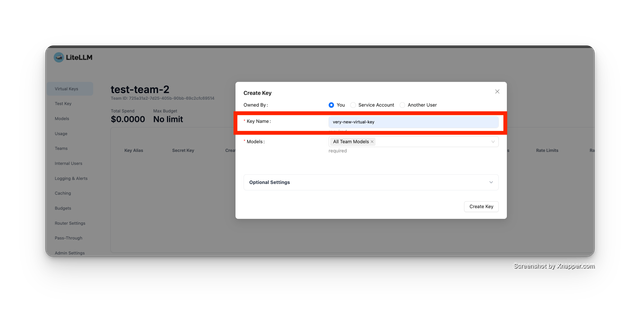
- Check Hashicorp Vault for secret
LiteLLM stores secret under the prefix_for_stored_virtual_keys path (default: litellm/)
Team-specific overrides
When running the LiteLLM proxy you can override the Vault location per team. Use the Team-Level Secret Manager Settings flow in the dashboard and configure the panel shown below:
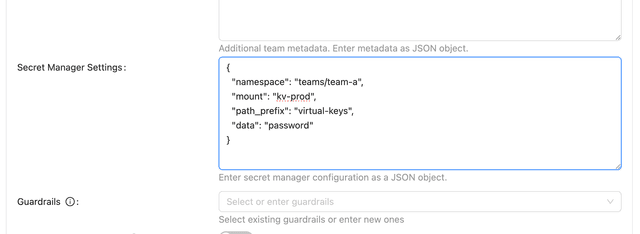
Use the following structure for the JSON payload:
{
  "namespace": "teams/team-a",
  "mount": "kv-prod",
  "path_prefix": "virtual-keys",
  "data": "password"
}
namespace– overrides theX-Vault-Namespaceheader.mount– which KV engine mount to use (defaults tosecret).path_prefix– additional path segments between the mount and the secret name.data– the field name inside the KV payload (defaults tokey).
Whenever LiteLLM stores or deletes virtual keys for that team, these overrides are applied so you can keep each team’s credentials in its own namespace, mount, or field layout without changing the global Vault configuration.