Quickstart
LiteLLM ships as a ready-to-run gateway. You start it with one command (or one click), then do everything else in your browser: connect providers, add models, create keys, and send test requests from the built-in Admin UI. No config files are required for this guide.
By the end you will have LiteLLM running at http://localhost:4000 with a model connected, a virtual key issued, and a request served through the gateway.
1. Start LiteLLM
- Run locally
- 1-click deploy
curl -sSL https://docs.litellm.ai/docker-compose.yml | docker compose -f - up -d
This brings up the gateway on port 4000 and a Postgres database that stores your models, keys, and spend logs. The compose file it pipes in defines just those two services; to customize anything (pin a release tag instead of latest, change credentials), download it and start it the usual way:
curl -sSLO https://docs.litellm.ai/docker-compose.yml
docker compose up -d
For the rest of this guide, use your deployment's URL wherever you see http://localhost:4000.
LITELLM_SALT_KEY encrypts the provider API keys you add in the UI. The quickstart compose file ships a placeholder; before adding models to anything you intend to keep, set it to a long random value, and never change it afterwards. Credentials encrypted with the old value cannot be decrypted with a new one. A password generator works well for this.
2. Log in to the Admin UI
Open http://localhost:4000/ui. The username is admin and the password is your LITELLM_MASTER_KEY value (sk-1234 in the quickstart compose file).
3. Add your first model
Go to Models + Endpoints, open the Add Model tab, pick your provider and the models you want to expose, and paste your provider API key. LiteLLM ships with each provider's model catalog, so you select models rather than type them.
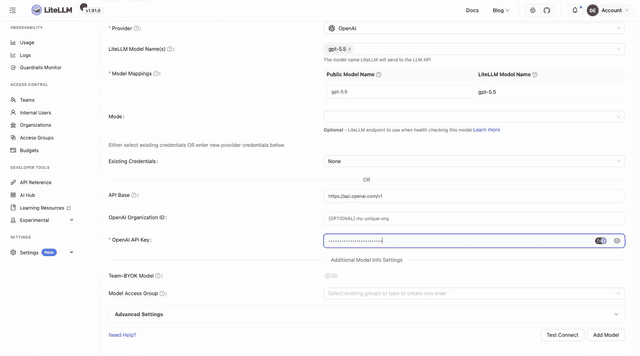
Click Test Connect to verify the key against the provider, then Add Model. It appears under All Models with its pricing already mapped:
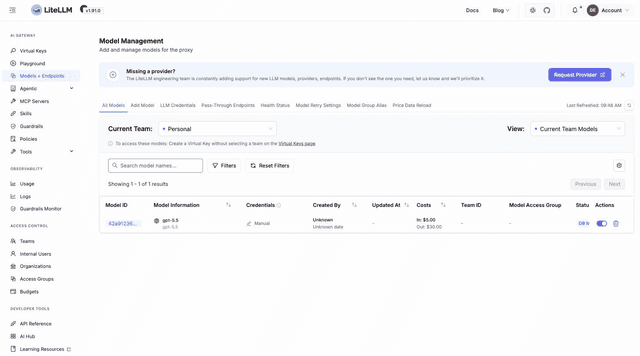
If you prefer to manage provider keys as environment variables, download the compose file, add them to the litellm service (for example OPENAI_API_KEY: ${OPENAI_API_KEY}), and enter os.environ/OPENAI_API_KEY in the API key field instead of the raw key.
4. Send a test message
Go to Playground, select your model, and send a message. The request goes through the gateway to your provider, and the response comes back with latency and token counts:
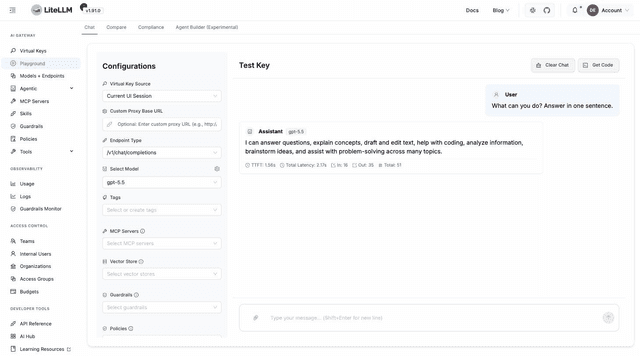
Your gateway works end to end. The Get Code button in the Playground generates the equivalent API call for your language.
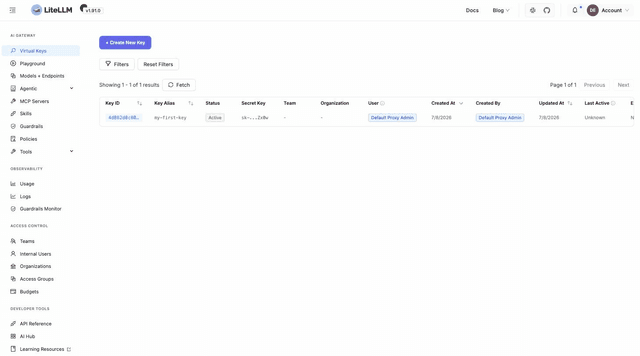
5. Create a virtual key
Virtual keys are what you hand to applications and teammates instead of raw provider keys. Each key can carry its own budget, rate limits, and model access, and all its spend is tracked automatically.
Go to Virtual Keys, click + Create New Key, give it a name, and click Create Key:
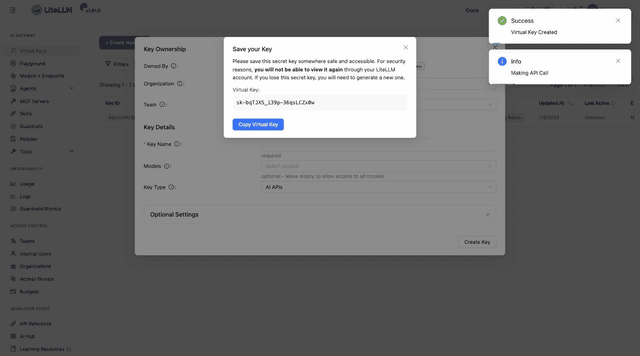
Copy the key now; it is shown only once.
6. Call the gateway from your app
The gateway is OpenAI-compatible, so any OpenAI SDK works by pointing it at http://localhost:4000 with your virtual key.
- curl
- OpenAI Python SDK
- OpenAI JS SDK
curl http://localhost:4000/v1/chat/completions \
  -H 'Authorization: Bearer sk-<your-virtual-key>' \
  -H 'Content-Type: application/json' \
  -d '{
    "model": "gpt-5.5",
    "messages": [{"role": "user", "content": "Say hello in five words."}]
  }'
Expected response:
{
  "id": "chatcmpl-DzGKiNRbQ4fe9Mgt8HSHFQ6ApfRJi",
  "model": "gpt-5.5",
  "object": "chat.completion",
  "choices": [
    {
      "finish_reason": "stop",
      "index": 0,
      "message": {
        "content": "Hello, nice to meet you.",
        "role": "assistant"
      }
    }
  ],
  "usage": {
    "completion_tokens": 70,
    "prompt_tokens": 12,
    "total_tokens": 82
  }
}
from openai import OpenAI

client = OpenAI(
    base_url="http://localhost:4000",
    api_key="sk-<your-virtual-key>",
)

response = client.chat.completions.create(
    model="gpt-5.5",
    messages=[{"role": "user", "content": "Say hello in five words."}],
)
print(response.choices[0].message.content)
import OpenAI from "openai";

const client = new OpenAI({
  baseURL: "http://localhost:4000",
  apiKey: "sk-<your-virtual-key>",
});

const response = await client.chat.completions.create({
  model: "gpt-5.5",
  messages: [{ role: "user", content: "Say hello in five words." }],
});
console.log(response.choices[0].message.content);
The whole flow, end to end
Running without a database
If you only need the OpenAI-compatible API (no Admin UI model management, virtual keys, or spend tracking), you can run the plain litellm image with a config file instead:
# litellm_config.yaml
model_list:
  - model_name: gpt-5.5
    litellm_params:
      model: openai/gpt-5.5
      api_key: os.environ/OPENAI_API_KEY
docker run \
  -v $(pwd)/litellm_config.yaml:/app/config.yaml \
  -e OPENAI_API_KEY=<your-openai-key> \
  -e LITELLM_MASTER_KEY=sk-1234 \
  -p 4000:4000 \
  docker.litellm.ai/berriai/litellm:latest \
  --config /app/config.yaml
Requests authenticate with the master key. See the full config reference for everything the file supports.
Next steps
Going to production: the Production Deployment guide covers Helm, Terraform, and Kubernetes on AWS, GCP, and Azure, and the production checklist covers hardening and tuning. Full container and database options, including Redis and Prometheus, are covered in the repo docker-compose.yml.