Logging
Log Proxy input, output, and exceptions using:
- Langfuse
- OpenTelemetry
- GCS, s3, Azure (Blob) Buckets
- AWS SQS
- Lunary
- MLflow
- Deepeval
- Custom Callbacks - Custom code and API endpoints
- Langsmith
- DataDog
- Azure Sentinel
- DynamoDB
- etc.
Getting the LiteLLM Call ID
LiteLLM generates a unique call_id for each request. This call_id can be
used to track the request across the system. This can be very useful for finding
the info for a particular request in a logging system like one of the systems
mentioned in this page.
curl -i -sSL --location 'http://0.0.0.0:4000/chat/completions' \
    --header 'Authorization: Bearer sk-1234' \
    --header 'Content-Type: application/json' \
    --data '{
      "model": "gpt-3.5-turbo",
      "messages": [{"role": "user", "content": "what llm are you"}]
    }' | grep 'x-litellm'
The output of this is:
x-litellm-call-id: b980db26-9512-45cc-b1da-c511a363b83f
x-litellm-model-id: cb41bc03f4c33d310019bae8c5afdb1af0a8f97b36a234405a9807614988457c
x-litellm-model-api-base: https://x-example-1234.openai.azure.com
x-litellm-version: 1.40.21
x-litellm-response-cost: 2.85e-05
x-litellm-key-tpm-limit: None
x-litellm-key-rpm-limit: None
A number of these headers could be useful for troubleshooting, but the
x-litellm-call-id is the one that is most useful for tracking a request across
components in your system, including in logging tools.
Logging Features
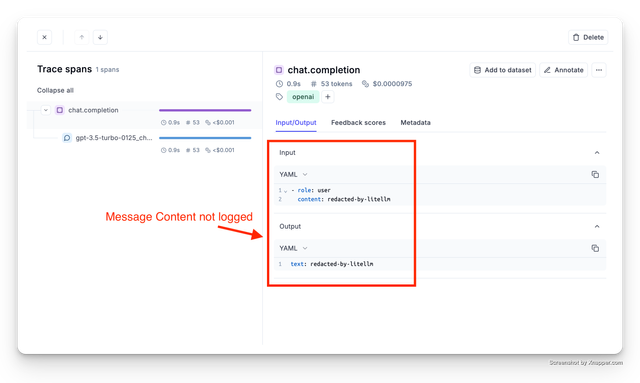
Redact Messages, Response Content
Set litellm.turn_off_message_logging=True This will prevent the messages and responses from being logged to your logging provider, but request metadata - e.g. spend, will still be tracked. Useful for privacy/compliance when handling sensitive data.
- Global
- Per Request
1. Setup config.yaml
model_list:
 - model_name: gpt-3.5-turbo
    litellm_params:
      model: gpt-3.5-turbo
litellm_settings:
  success_callback: ["langfuse"]
  turn_off_message_logging: True # 👈 Key Change
2. Send request
curl --location 'http://0.0.0.0:4000/chat/completions' \
    --header 'Content-Type: application/json' \
    --data '{
    "model": "gpt-3.5-turbo",
    "messages": [
        {
        "role": "user",
        "content": "what llm are you"
        }
    ]
}'
Dynamic request message redaction is in BETA.
Pass in a request header to enable message redaction for a request.
x-litellm-enable-message-redaction: true
Example config.yaml
**1. Setup config.yaml **
model_list:
 - model_name: gpt-3.5-turbo
    litellm_params:
      model: gpt-3.5-turbo
2. Setup per request header
curl -L -X POST 'http://0.0.0.0:4000/v1/chat/completions' \
-H 'Content-Type: application/json' \
-H 'Authorization: Bearer sk-zV5HlSIm8ihj1F9C_ZbB1g' \
-H 'x-litellm-enable-message-redaction: true' \
-d '{
  "model": "gpt-3.5-turbo-testing",
  "messages": [
    {
      "role": "user",
      "content": "Hey, how'\''s it going 1234?"
    }
  ]
}'
3. Check Logging Tool + Spend Logs
Logging Tool
Spend Logs

Redacting UserAPIKeyInfo
Redact information about the user api key (hashed token, user_id, team id, etc.), from logs.
Currently supported for Langfuse, OpenTelemetry, Logfire, ArizeAI logging.
litellm_settings:
  callbacks: ["langfuse"]
  redact_user_api_key_info: true
Disable Message Redaction
If you have litellm.turn_on_message_logging turned on, you can override it for specific requests by
setting a request header LiteLLM-Disable-Message-Redaction: true.
curl --location 'http://0.0.0.0:4000/chat/completions' \
    --header 'Content-Type: application/json' \
    --header 'LiteLLM-Disable-Message-Redaction: true' \
    --data '{
    "model": "gpt-3.5-turbo",
    "messages": [
        {
        "role": "user",
        "content": "what llm are you"
        }
    ]
}'
Turn off all tracking/logging
For some use cases, you may want to turn off all tracking/logging. You can do this by passing no-log=True in the request body.
Disable this by setting global_disable_no_log_param:true in your config.yaml file.
litellm_settings:
  global_disable_no_log_param: True
- Curl Request
- OpenAI
curl -L -X POST 'http://0.0.0.0:4000/v1/chat/completions' \
-H 'Content-Type: application/json' \
-H 'Authorization: Bearer <litellm-api-key>' \
-d '{
    "model": "openai/gpt-3.5-turbo",
    "messages": [
      {
        "role": "user",
        "content": [
          {
            "type": "text",
            "text": "What'\''s in this image?"
          }
        ]
      }
    ],
    "max_tokens": 300,
    "no-log": true # 👈 Key Change
}'
import openai
client = openai.OpenAI(
    api_key="anything",
    base_url="http://0.0.0.0:4000"
)

# request sent to model set on litellm proxy, `litellm --model`
response = client.chat.completions.create(
    model="gpt-3.5-turbo",
    messages = [
        {
            "role": "user",
            "content": "this is a test request, write a short poem"
        }
    ],
    extra_body={
      "no-log": True # 👈 Key Change
    }
)

print(response)
Expected Console Log
LiteLLM.Info: "no-log request, skipping logging"
✨ Dynamically Disable specific callbacks
This is an enterprise feature.
For some use cases, you may want to disable specific callbacks for a request. You can do this by passing x-litellm-disable-callbacks: <callback_name> in the request headers.
Send the list of callbacks to disable in the request header x-litellm-disable-callbacks.
- Curl Request
- OpenAI Python SDK
curl --location 'http://0.0.0.0:4000/chat/completions' \
    --header 'Content-Type: application/json' \
    --header 'Authorization: Bearer sk-1234' \
    --header 'x-litellm-disable-callbacks: langfuse' \
    --data '{
    "model": "claude-sonnet-4-20250514",
    "messages": [
        {
        "role": "user",
        "content": "what llm are you"
        }
    ]
}'
import openai

client = openai.OpenAI(
    api_key="sk-1234",
    base_url="http://0.0.0.0:4000"
)

response = client.chat.completions.create(
    model="claude-sonnet-4-20250514",
    messages=[
        {
            "role": "user",
            "content": "what llm are you"
        }
    ],
    extra_headers={
        "x-litellm-disable-callbacks": "langfuse"
    }
)

print(response)
✨ Conditional Logging by Virtual Keys, Teams
Use this to:
- Conditionally enable logging for some virtual keys/teams
- Set different logging providers for different virtual keys/teams
👉 Get Started - Team/Key Based Logging
What gets logged?
Found under kwargs["standard_logging_object"]. This is a standard payload, logged for every response.
👉 Standard Logging Payload Specification
Langfuse
We will use the --config to set litellm.success_callback = ["langfuse"] this will log all successful LLM calls to langfuse. Make sure to set LANGFUSE_PUBLIC_KEY and LANGFUSE_SECRET_KEY in your environment
Step 1 Install langfuse
uv add langfuse>=2.0.0
Step 2: Create a config.yaml file and set litellm_settings: success_callback
model_list:
 - model_name: gpt-3.5-turbo
    litellm_params:
      model: gpt-3.5-turbo
litellm_settings:
  success_callback: ["langfuse"]
Step 3: Set required env variables for logging to langfuse
export LANGFUSE_PUBLIC_KEY="pk_kk"
export LANGFUSE_SECRET_KEY="sk_ss"
# Optional, defaults to https://cloud.langfuse.com
export LANGFUSE_HOST="https://xxx.langfuse.com"
Step 4: Start the proxy, make a test request
Start proxy
litellm --config config.yaml --debug
Test Request
litellm --test
Expected output on Langfuse
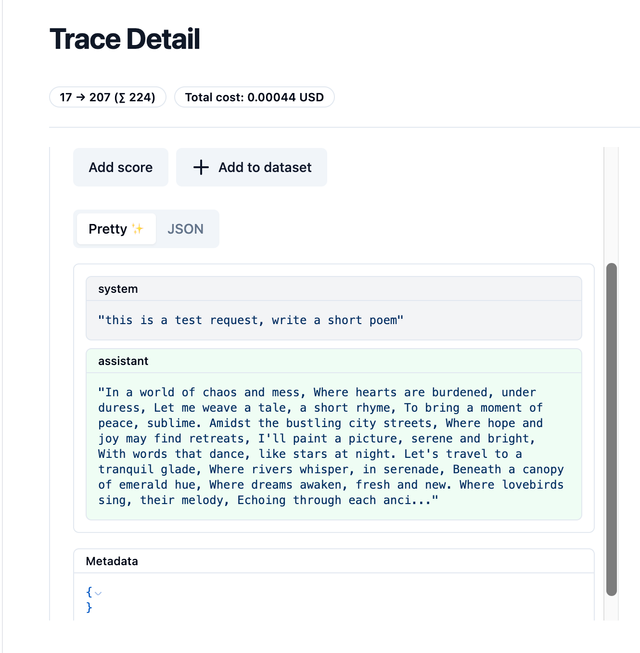
Logging Metadata to Langfuse
- Curl Request
- OpenAI v1.0.0+
- Langchain
Pass metadata as part of the request body
curl --location 'http://0.0.0.0:4000/chat/completions' \
    --header 'Content-Type: application/json' \
    --data '{
    "model": "gpt-3.5-turbo",
    "messages": [
        {
        "role": "user",
        "content": "what llm are you"
        }
    ],
    "metadata": {
        "generation_name": "ishaan-test-generation",
        "generation_id": "gen-id22",
        "trace_id": "trace-id22",
        "trace_user_id": "user-id2"
    }
}'
Set extra_body={"metadata": { }} to metadata you want to pass
import openai
client = openai.OpenAI(
    api_key="anything",
    base_url="http://0.0.0.0:4000"
)

# request sent to model set on litellm proxy, `litellm --model`
response = client.chat.completions.create(
    model="gpt-3.5-turbo",
    messages = [
        {
            "role": "user",
            "content": "this is a test request, write a short poem"
        }
    ],
    extra_body={
        "metadata": {
            "generation_name": "ishaan-generation-openai-client",
            "generation_id": "openai-client-gen-id22",
            "trace_id": "openai-client-trace-id22",
            "trace_user_id": "openai-client-user-id2"
        }
    }
)

print(response)
from langchain.chat_models import ChatOpenAI
from langchain.prompts.chat import (
    ChatPromptTemplate,
    HumanMessagePromptTemplate,
    SystemMessagePromptTemplate,
)
from langchain.schema import HumanMessage, SystemMessage

chat = ChatOpenAI(
    openai_api_base="http://0.0.0.0:4000",
    model = "gpt-3.5-turbo",
    temperature=0.1,
    extra_body={
        "metadata": {
            "generation_name": "ishaan-generation-langchain-client",
            "generation_id": "langchain-client-gen-id22",
            "trace_id": "langchain-client-trace-id22",
            "trace_user_id": "langchain-client-user-id2"
        }
    }
)

messages = [
    SystemMessage(
        content="You are a helpful assistant that im using to make a test request to."
    ),
    HumanMessage(
        content="test from litellm. tell me why it's amazing in 1 sentence"
    ),
]
response = chat(messages)

print(response)
Custom Tags
Set tags as part of your request body
- OpenAI Python v1.0.0+
- Curl Request
- Langchain
import openai
client = openai.OpenAI(
    api_key="sk-1234",
    base_url="http://0.0.0.0:4000"
)

response = client.chat.completions.create(
    model="llama3",
    messages = [
        {
            "role": "user",
            "content": "this is a test request, write a short poem"
        }
    ],
    user="palantir",
    extra_body={
        "metadata": {
            "tags": ["jobID:214590dsff09fds", "taskName:run_page_classification"]
        }
    }
)

print(response)
Pass metadata as part of the request body
curl --location 'http://0.0.0.0:4000/chat/completions' \
    --header 'Content-Type: application/json' \
    --header 'Authorization: Bearer sk-1234' \
    --data '{
    "model": "llama3",
    "messages": [
        {
        "role": "user",
        "content": "what llm are you"
        }
    ],
    "user": "palantir",
    "metadata": {
        "tags": ["jobID:214590dsff09fds", "taskName:run_page_classification"]
    }
}'
from langchain.chat_models import ChatOpenAI
from langchain.prompts.chat import (
    ChatPromptTemplate,
    HumanMessagePromptTemplate,
    SystemMessagePromptTemplate,
)
from langchain.schema import HumanMessage, SystemMessage
import os

os.environ["OPENAI_API_KEY"] = "sk-1234"

chat = ChatOpenAI(
    openai_api_base="http://0.0.0.0:4000",
    model = "llama3",
    user="palantir",
    extra_body={
        "metadata": {
            "tags": ["jobID:214590dsff09fds", "taskName:run_page_classification"]
        }
    }
)

messages = [
    SystemMessage(
        content="You are a helpful assistant that im using to make a test request to."
    ),
    HumanMessage(
        content="test from litellm. tell me why it's amazing in 1 sentence"
    ),
]
response = chat(messages)

print(response)
LiteLLM Tags - cache_hit, cache_key
Use this if you want to control which LiteLLM-specific fields are logged as tags by the LiteLLM proxy. By default LiteLLM Proxy logs no LiteLLM-specific fields
| LiteLLM specific field | Description | Example Value |
|---|---|---|
cache_hit | Indicates whether a cache hit occurred (True) or not (False) | true, false |
cache_key | The Cache key used for this request | d2b758c**** |
proxy_base_url | The base URL for the proxy server, the value of env var PROXY_BASE_URL on your server | https://proxy.example.com |
user_api_key_alias | An alias for the LiteLLM Virtual Key. | prod-app1 |
user_api_key_user_id | The unique ID associated with a user's API key. | user_123, user_456 |
user_api_key_user_email | The email associated with a user's API key. | user@example.com, admin@example.com |
user_api_key_team_alias | An alias for a team associated with an API key. | team_alpha, dev_team |
Usage
Specify langfuse_default_tags to control what litellm fields get logged on Langfuse
Example config.yaml
model_list:
  - model_name: gpt-4
    litellm_params:
      model: openai/fake
      api_key: fake-key
      api_base: https://exampleopenaiendpoint-production.up.railway.app/

litellm_settings:
  success_callback: ["langfuse"]

  # 👇 Key Change
  langfuse_default_tags: ["cache_hit", "cache_key", "proxy_base_url", "user_api_key_alias", "user_api_key_user_id", "user_api_key_user_email", "user_api_key_team_alias", "semantic-similarity", "proxy_base_url"]
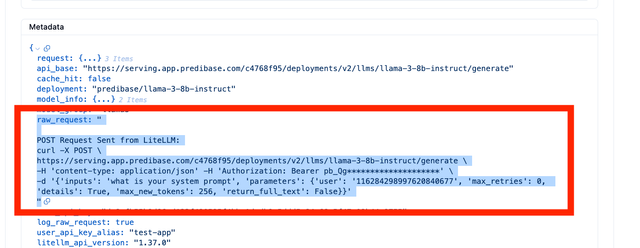
View POST sent from LiteLLM to provider
Use this when you want to view the RAW curl request sent from LiteLLM to the LLM API
- Curl Request
- OpenAI v1.0.0+
- Langchain
Pass metadata as part of the request body
curl --location 'http://0.0.0.0:4000/chat/completions' \
    --header 'Content-Type: application/json' \
    --data '{
    "model": "gpt-3.5-turbo",
    "messages": [
        {
        "role": "user",
        "content": "what llm are you"
        }
    ],
    "metadata": {
        "log_raw_request": true
    }
}'
Set extra_body={"metadata": {"log_raw_request": True }} to metadata you want to pass
import openai
client = openai.OpenAI(
    api_key="anything",
    base_url="http://0.0.0.0:4000"
)

# request sent to model set on litellm proxy, `litellm --model`
response = client.chat.completions.create(
    model="gpt-3.5-turbo",
    messages = [
        {
            "role": "user",
            "content": "this is a test request, write a short poem"
        }
    ],
    extra_body={
        "metadata": {
            "log_raw_request": True
        }
    }
)

print(response)
from langchain.chat_models import ChatOpenAI
from langchain.prompts.chat import (
    ChatPromptTemplate,
    HumanMessagePromptTemplate,
    SystemMessagePromptTemplate,
)
from langchain.schema import HumanMessage, SystemMessage

chat = ChatOpenAI(
    openai_api_base="http://0.0.0.0:4000",
    model = "gpt-3.5-turbo",
    temperature=0.1,
    extra_body={
        "metadata": {
            "log_raw_request": True
        }
    }
)

messages = [
    SystemMessage(
        content="You are a helpful assistant that im using to make a test request to."
    ),
    HumanMessage(
        content="test from litellm. tell me why it's amazing in 1 sentence"
    ),
]
response = chat(messages)

print(response)
Expected Output on Langfuse
You will see raw_request in your Langfuse Metadata. This is the RAW CURL command sent from LiteLLM to your LLM API provider
OpenTelemetry
The full OpenTelemetry reference — span hierarchy, every emitted span and attribute, metrics, semconv mode, and troubleshooting — lives at Observability → OpenTelemetry Integration. The section below is a proxy-focused quickstart.
[Optional] Customize OTEL Service Name and OTEL TRACER NAME by setting the following variables in your environment
OTEL_TRACER_NAME=<your-trace-name>     # default="litellm"
OTEL_SERVICE_NAME=<your-service-name>` # default="litellm"
- Log to console
- Log to Honeycomb
- Log to Traceloop Cloud
- Log to OTEL HTTP Collector
- Log to OTEL GRPC Collector
Step 1: Set callbacks and env vars
Add the following to your env
OTEL_EXPORTER="console"
Add otel as a callback on your litellm_config.yaml
litellm_settings:
  callbacks: ["otel"]
Step 2: Start the proxy, make a test request
Start proxy
litellm --config config.yaml --detailed_debug
Test Request
curl --location 'http://0.0.0.0:4000/chat/completions' \
    --header 'Content-Type: application/json' \
    --data ' {
    "model": "gpt-3.5-turbo",
    "messages": [
        {
        "role": "user",
        "content": "what llm are you"
        }
    ]
    }'
Step 3: Expect to see the following logged on your server logs / console
This is the Span from OTEL Logging
{
    "name": "litellm-acompletion",
    "context": {
        "trace_id": "0x8d354e2346060032703637a0843b20a3",
        "span_id": "0xd8d3476a2eb12724",
        "trace_state": "[]"
    },
    "kind": "SpanKind.INTERNAL",
    "parent_id": null,
    "start_time": "2024-06-04T19:46:56.415888Z",
    "end_time": "2024-06-04T19:46:56.790278Z",
    "status": {
        "status_code": "OK"
    },
    "attributes": {
        "model": "llama3-8b-8192"
    },
    "events": [],
    "links": [],
    "resource": {
        "attributes": {
            "service.name": "litellm"
        },
        "schema_url": ""
    }
}
Quick Start - Log to Honeycomb
Step 1: Set callbacks and env vars
Add the following to your env
OTEL_EXPORTER="otlp_http"
OTEL_ENDPOINT="https://api.honeycomb.io/v1/traces"
OTEL_HEADERS="x-honeycomb-team=<your-api-key>"
Add otel as a callback on your litellm_config.yaml
litellm_settings:
  callbacks: ["otel"]
Step 2: Start the proxy, make a test request
Start proxy
litellm --config config.yaml --detailed_debug
Test Request
curl --location 'http://0.0.0.0:4000/chat/completions' \
    --header 'Content-Type: application/json' \
    --data ' {
    "model": "gpt-3.5-turbo",
    "messages": [
        {
        "role": "user",
        "content": "what llm are you"
        }
    ]
    }'
Quick Start - Log to Traceloop
Step 1: Add the following to your env
OTEL_EXPORTER="otlp_http"
OTEL_ENDPOINT="https://api.traceloop.com"
OTEL_HEADERS="Authorization=Bearer%20<your-api-key>"
Step 2: Add otel as a callbacks
litellm_settings:
  callbacks: ["otel"]
Step 3: Start the proxy, make a test request
Start proxy
litellm --config config.yaml --detailed_debug
Test Request
curl --location 'http://0.0.0.0:4000/chat/completions' \
    --header 'Content-Type: application/json' \
    --data ' {
    "model": "gpt-3.5-turbo",
    "messages": [
        {
        "role": "user",
        "content": "what llm are you"
        }
    ]
    }'
Quick Start - Log to OTEL Collector
Step 1: Set callbacks and env vars
Add the following to your env
OTEL_EXPORTER="otlp_http"
OTEL_ENDPOINT="http://0.0.0.0:4317"
OTEL_HEADERS="x-honeycomb-team=<your-api-key>" # Optional
Add otel as a callback on your litellm_config.yaml
litellm_settings:
  callbacks: ["otel"]
Step 2: Start the proxy, make a test request
Start proxy
litellm --config config.yaml --detailed_debug
Test Request
curl --location 'http://0.0.0.0:4000/chat/completions' \
    --header 'Content-Type: application/json' \
    --data ' {
    "model": "gpt-3.5-turbo",
    "messages": [
        {
        "role": "user",
        "content": "what llm are you"
        }
    ]
    }'
Quick Start - Log to OTEL GRPC Collector
Step 1: Set callbacks and env vars
Add the following to your env
OTEL_EXPORTER="otlp_grpc"
OTEL_ENDPOINT="http:/0.0.0.0:4317"
OTEL_HEADERS="x-honeycomb-team=<your-api-key>" # Optional
Note: OTLP gRPC requires
grpcio. Install viauv add "litellm[grpc]"(orgrpcio).
Add otel as a callback on your litellm_config.yaml
litellm_settings:
  callbacks: ["otel"]
Step 2: Start the proxy, make a test request
Start proxy
litellm --config config.yaml --detailed_debug
Test Request
curl --location 'http://0.0.0.0:4000/chat/completions' \
    --header 'Content-Type: application/json' \
    --data ' {
    "model": "gpt-3.5-turbo",
    "messages": [
        {
        "role": "user",
        "content": "what llm are you"
        }
    ]
    }'
** 🎉 Expect to see this trace logged in your OTEL collector**
Redacting Messages, Response Content
Set message_logging=False for otel, no messages / response will be logged
litellm_settings:
  callbacks: ["otel"]

## 👇 Key Change
callback_settings:
  otel:
    message_logging: False
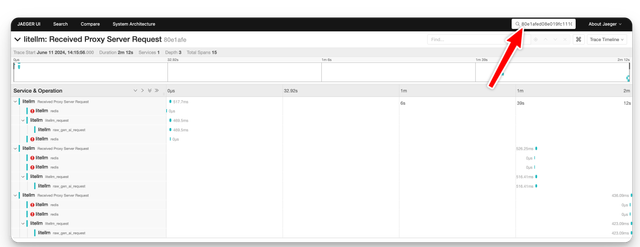
Traceparent Header
Context propagation across Services Traceparent HTTP Header
❓ Use this when you want to pass information about the incoming request in a distributed tracing system
✅ Key change: Pass the traceparent header in your requests. Read more about traceparent headers here
traceparent: 00-80e1afed08e019fc1110464cfa66635c-7a085853722dc6d2-01
Example Usage
- Make Request to LiteLLM Proxy with
traceparentheader
import openai
import uuid

client = openai.OpenAI(api_key="sk-1234", base_url="http://0.0.0.0:4000")
example_traceparent = f"00-80e1afed08e019fc1110464cfa66635c-02e80198930058d4-01"
extra_headers = {
    "traceparent": example_traceparent
}
_trace_id = example_traceparent.split("-")[1]

print("EXTRA HEADERS: ", extra_headers)
print("Trace ID: ", _trace_id)

response = client.chat.completions.create(
    model="llama3",
    messages=[
        {"role": "user", "content": "this is a test request, write a short poem"}
    ],
    extra_headers=extra_headers,
)

print(response)
# EXTRA HEADERS:  {'traceparent': '00-80e1afed08e019fc1110464cfa66635c-02e80198930058d4-01'}
# Trace ID:  80e1afed08e019fc1110464cfa66635c
- Lookup Trace ID on OTEL Logger
Search for Trace=80e1afed08e019fc1110464cfa66635c on your OTEL Collector
Forwarding Traceparent HTTP Header to LLM APIs
Use this if you want to forward the traceparent headers to your self hosted LLMs like vLLM
Set forward_traceparent_to_llm_provider: True in your config.yaml. This will forward the traceparent header to your LLM API
Only use this for self hosted LLMs, this can cause Bedrock, VertexAI calls to fail
litellm_settings:
  forward_traceparent_to_llm_provider: True
Google Cloud Storage Buckets
Log LLM Logs to Google Cloud Storage Buckets
✨ This is an Enterprise only feature Get Started with Enterprise here
| Property | Details |
|---|---|
| Description | Log LLM Input/Output to cloud storage buckets |
| Load Test Benchmarks | Benchmarks |
| Google Docs on Cloud Storage | Google Cloud Storage |
Usage
- Add
gcs_bucketto LiteLLM Config.yaml
model_list:
- litellm_params:
    api_base: https://exampleopenaiendpoint-production.up.railway.app/
    api_key: my-fake-key
    model: openai/my-fake-model
  model_name: fake-openai-endpoint

litellm_settings:
  callbacks: ["gcs_bucket"] # 👈 KEY CHANGE # 👈 KEY CHANGE
- Set required env variables
GCS_BUCKET_NAME="<your-gcs-bucket-name>"
GCS_PATH_SERVICE_ACCOUNT="/Users/ishaanjaffer/Downloads/adroit-crow-413218-a956eef1a2a8.json" # Add path to service account.json
- Start Proxy
litellm --config /path/to/config.yaml
- Test it!
curl --location 'http://0.0.0.0:4000/chat/completions' \
--header 'Content-Type: application/json' \
--data ' {
      "model": "fake-openai-endpoint",
      "messages": [
        {
          "role": "user",
          "content": "what llm are you"
        }
      ],
    }
'
Expected Logs on GCS Buckets
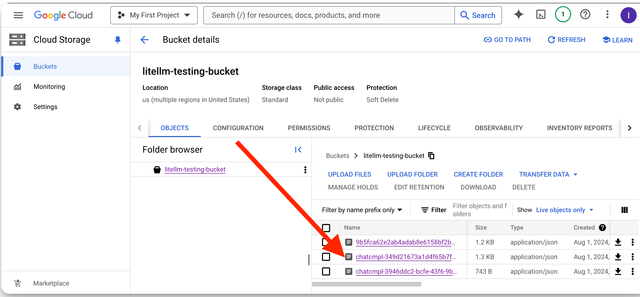
Fields Logged on GCS Buckets
The standard logging object is logged on GCS Bucket
Getting service_account.json from Google Cloud Console
- Go to Google Cloud Console
- Search for IAM & Admin
- Click on Service Accounts
- Select a Service Account
- Click on 'Keys' -> Add Key -> Create New Key -> JSON
- Save the JSON file and add the path to
GCS_PATH_SERVICE_ACCOUNT
Google Cloud Storage - PubSub Topic
Log LLM Logs/SpendLogs to Google Cloud Storage PubSub Topic
✨ This is an Enterprise only feature Get Started with Enterprise here
| Property | Details |
|---|---|
| Description | Log LiteLLM SpendLogs Table to Google Cloud Storage PubSub Topic |
When to use gcs_pubsub?
- If your LiteLLM Database has crossed 1M+ spend logs and you want to send
SpendLogsto a PubSub Topic that can be consumed by GCS BigQuery
Usage
- Add
gcs_pubsubto LiteLLM Config.yaml
model_list:
- litellm_params:
    api_base: https://exampleopenaiendpoint-production.up.railway.app/
    api_key: my-fake-key
    model: openai/my-fake-model
  model_name: fake-openai-endpoint

litellm_settings:
  callbacks: ["gcs_pubsub"] # 👈 KEY CHANGE # 👈 KEY CHANGE
- Set required env variables
GCS_PUBSUB_TOPIC_ID="litellmDB"
GCS_PUBSUB_PROJECT_ID="reliableKeys"
- Start Proxy
litellm --config /path/to/config.yaml
- Test it!
curl --location 'http://0.0.0.0:4000/chat/completions' \
--header 'Content-Type: application/json' \
--data ' {
      "model": "fake-openai-endpoint",
      "messages": [
        {
          "role": "user",
          "content": "what llm are you"
        }
      ],
    }
'
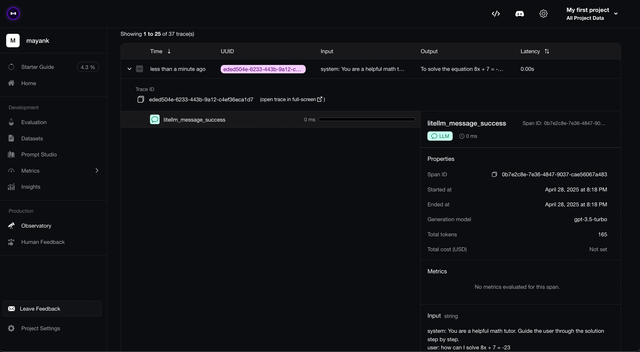
Deepeval
LiteLLM supports logging on Confidential AI (The Deepeval Platform):
Usage:
- Add
deepevalin the LiteLLMconfig.yaml
model_list:
  - model_name: gpt-4o
    litellm_params:
      model: gpt-4o
litellm_settings:
  success_callback: ["deepeval"]
  failure_callback: ["deepeval"]
- Set your environment variables in
.envfile.
CONFIDENT_API_KEY=<your-api-key>
You can obtain your CONFIDENT_API_KEY by logging into Confident AI platform.
- Start your proxy server:
litellm --config config.yaml --debug
- Make a request:
curl -X POST 'http://0.0.0.0:4000/chat/completions' \
-H 'Content-Type: application/json' \
-H 'Authorization: Bearer sk-1234' \
-d '{
    "model": "gpt-3.5-turbo",
    "messages": [
      {
        "role": "system",
        "content": "You are a helpful math tutor. Guide the user through the solution step by step."
      },
      {
        "role": "user",
        "content": "how can I solve 8x + 7 = -23"
      }
    ]
}'
- Check trace on platform:
s3 Buckets
We will use the --config to set
litellm.success_callback = ["s3"]
This will log all successful LLM calls to s3 Bucket
Step 1 Set AWS Credentials in .env
AWS_ACCESS_KEY_ID = ""
AWS_SECRET_ACCESS_KEY = ""
AWS_REGION_NAME = ""
Step 2: Create a config.yaml file and set litellm_settings: success_callback
model_list:
 - model_name: gpt-3.5-turbo
    litellm_params:
      model: gpt-3.5-turbo
litellm_settings:
  success_callback: ["s3_v2"]
  s3_callback_params:
    s3_bucket_name: logs-bucket-litellm   # AWS Bucket Name for S3
    s3_region_name: us-west-2              # AWS Region Name for S3
    s3_aws_access_key_id: os.environ/AWS_ACCESS_KEY_ID  # us os.environ/<variable name> to pass environment variables. This is AWS Access Key ID for S3
    s3_aws_secret_access_key: os.environ/AWS_SECRET_ACCESS_KEY  # AWS Secret Access Key for S3
    s3_path: my-test-path # [OPTIONAL] set path in bucket you want to write logs to
    s3_endpoint_url: https://s3.amazonaws.com  # [OPTIONAL] S3 endpoint URL, if you want to use Backblaze/cloudflare s3 buckets
    s3_use_virtual_hosted_style: false # [OPTIONAL] use virtual-hosted-style URLs (bucket.endpoint/key) instead of path-style (endpoint/bucket/key). Useful for S3-compatible services like MinIO
    s3_strip_base64_files: false # [OPTIONAL] remove base64 files before storing in s3
    s3_server_side_encryption: aws:kms # [OPTIONAL] server-side encryption algorithm for log objects: AES256 or aws:kms
    s3_sse_kms_key_id: arn:aws:kms:us-west-2:111122223333:key/my-key-id # [OPTIONAL] KMS key id or ARN to encrypt log objects with; requires s3_server_side_encryption: aws:kms (inferred automatically if only the key id is set)
Step 3: Start the proxy, make a test request
Start proxy
litellm --config config.yaml --debug
Test Request
curl --location 'http://0.0.0.0:4000/chat/completions' \
    --header 'Content-Type: application/json' \
    --data ' {
    "model": "Azure OpenAI GPT-4 East",
    "messages": [
        {
        "role": "user",
        "content": "what llm are you"
        }
    ]
    }'
Your logs should be available on the specified s3 Bucket
Team Alias Prefix in Object Key
You can add the team alias to the object key by setting the team_alias in the config.yaml file.
This will prefix the object key with the team alias.
litellm_settings:
  callbacks: ["s3_v2"]
  s3_callback_params:
    s3_bucket_name: logs-bucket-litellm
    s3_region_name: us-west-2
    s3_aws_access_key_id: os.environ/AWS_ACCESS_KEY_ID
    s3_aws_secret_access_key: os.environ/AWS_SECRET_ACCESS_KEY
    s3_path: my-test-path
    s3_endpoint_url: https://s3.amazonaws.com
    s3_use_team_prefix: true
On s3 bucket, you will see the object key as my-test-path/my-team-alias/...
Key Alias Prefix in Object Key
You can add the user api key alias to the s3 object key by enabling s3_use_key_prefix.
litellm_settings:
  callbacks: ["s3_v2"]
  s3_callback_params:
    s3_bucket_name: logs-bucket-litellm
    s3_region_name: us-west-2
    s3_aws_access_key_id: os.environ/AWS_ACCESS_KEY_ID
    s3_aws_secret_access_key: os.environ/AWS_SECRET_ACCESS_KEY
    s3_path: my-test-path
    s3_endpoint_url: https://s3.amazonaws.com
    s3_use_key_prefix: true
On s3 bucket, you will see the object key as my-test-path/my-key-alias/...
if both team alias and key alias are enabled then the path becomes
my-test-path/my-team-alias/my-key-alias/...
AWS SQS
| Property | Details |
|---|---|
| Description | Log LLM Input/Output to AWS SQS Queue |
| AWS Docs on SQS | AWS SQS |
| Fields Logged to SQS | LiteLLM Standard Logging Payload is logged for each LLM call |
Log LLM Logs to AWS Simple Queue Service (SQS)
We will use the litellm --config to set
litellm.callbacks = ["aws_sqs"]
This will log all successful LLM calls to AWS SQS Queue
Step 1 Set AWS Credentials in .env
AWS_ACCESS_KEY_ID = ""
AWS_SECRET_ACCESS_KEY = ""
AWS_REGION_NAME = ""
Step 2: Create a config.yaml file and set litellm_settings: callbacks
model_list:
  - model_name: gpt-4o
    litellm_params:
      model: gpt-4o

litellm_settings:
  callbacks: ["aws_sqs"]

  aws_sqs_callback_params:
    # --- 🧱 Required Parameters ---
    sqs_queue_url: https://sqs.us-west-2.amazonaws.com/123456789012/my-queue
    # The AWS SQS Queue URL to which LiteLLM will send log events.

    sqs_region_name: us-west-2
    # AWS Region for your SQS queue (e.g., us-east-1, eu-central-1, etc.)

    # --- Logging Controls ---
    sqs_strip_base64_files: false
    # If true, LiteLLM will remove or redact base64-encoded binary data (e.g., PDFs, images, audio)
    # from logged messages to avoid large payloads. SQS has a 1 MB payload size limit.
    s3_use_team_prefix: false
    # If true, Litellm will add the team alias prefix to s3 path
    s3_use_key_prefix: false
    # If true, Litellm will add the key alias prefix to s3 path
Step 3: Start the proxy, make a test request
Start proxy
litellm --config config.yaml --debug
Test Request
curl --location 'http://0.0.0.0:4000/chat/completions' \
    --header 'Content-Type: application/json' \
    --data ' {
    "model": "gpt-4o",
    "messages": [
        {
        "role": "user",
        "content": "what llm are you"
        }
    ]
    }'
Azure Blob Storage
Log LLM Logs to Azure Data Lake Storage
✨ This is an Enterprise only feature Get Started with Enterprise here
| Property | Details |
|---|---|
| Description | Log LLM Input/Output to Azure Blob Storage (Bucket) |
| Azure Docs on Data Lake Storage | Azure Data Lake Storage |
Usage
- Add
azure_storageto LiteLLM Config.yaml
model_list:
  - model_name: fake-openai-endpoint
    litellm_params:
      model: openai/fake
      api_key: fake-key
      api_base: https://exampleopenaiendpoint-production.up.railway.app/

litellm_settings:
  callbacks: ["azure_storage"] # 👈 KEY CHANGE # 👈 KEY CHANGE
- Set required env variables
# Required Environment Variables for Azure Storage
AZURE_STORAGE_ACCOUNT_NAME="litellm2" # The name of the Azure Storage Account to use for logging
AZURE_STORAGE_FILE_SYSTEM="litellm-logs" # The name of the Azure Storage File System to use for logging.  (Typically the Container name)

# Authentication Variables
# Option 1: Use Storage Account Key
AZURE_STORAGE_ACCOUNT_KEY="xxxxxxxxxxxxxxxxxxxxxxxxxxxxxxxxxxxxxxxxxxxxxxxxxxxxxxxxxxxxxxxx" # The Azure Storage Account Key to use for Authentication

# Option 2: Use Tenant ID + Client ID + Client Secret
AZURE_STORAGE_TENANT_ID="985efd7cxxxxxxxxxx" # The Application Tenant ID to use for Authentication
AZURE_STORAGE_CLIENT_ID="abe66585xxxxxxxxxx" # The Application Client ID to use for Authentication
AZURE_STORAGE_CLIENT_SECRET="uMS8Qxxxxxxxxxx" # The Application Client Secret to use for Authentication
- Start Proxy
litellm --config /path/to/config.yaml
- Test it!
curl --location 'http://0.0.0.0:4000/chat/completions' \
--header 'Content-Type: application/json' \
--data ' {
      "model": "fake-openai-endpoint",
      "messages": [
        {
          "role": "user",
          "content": "what llm are you"
        }
      ],
    }
'
Expected Logs on Azure Data Lake Storage
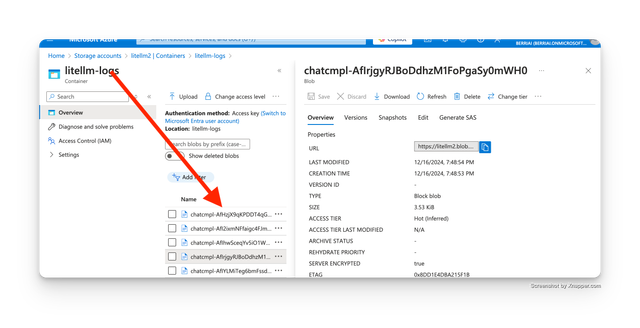
Fields Logged on Azure Data Lake Storage
The standard logging object is logged on Azure Data Lake Storage
Datadog
👉 Go here for using Datadog LLM Observability with LiteLLM Proxy
Azure Sentinel
👉 Go here for using Azure Sentinel with LiteLLM Proxy
Lunary
Step1: Install dependencies and set your environment variables
Install the dependencies
uv add litellm lunary
Get you Lunary public key from from https://app.lunary.ai/settings
export LUNARY_PUBLIC_KEY="<your-public-key>"
Step 2: Create a config.yaml and set lunary callbacks
model_list:
  - model_name: "*"
    litellm_params:
      model: "*"
litellm_settings:
  success_callback: ["lunary"]
  failure_callback: ["lunary"]
Step 3: Start the LiteLLM proxy
litellm --config config.yaml
Step 4: Make a request
curl -X POST 'http://0.0.0.0:4000/chat/completions' \
-H 'Content-Type: application/json' \
-d '{
    "model": "gpt-4o",
    "messages": [
      {
        "role": "system",
        "content": "You are a helpful math tutor. Guide the user through the solution step by step."
      },
      {
        "role": "user",
        "content": "how can I solve 8x + 7 = -23"
      }
    ]
}'
MLflow
👉 Follow the tutorial here to get started with mlflow on LiteLLM Proxy Server
Custom Callback Class [Async]
Use this when you want to run custom callbacks in python
Step 1 - Create your custom litellm callback class
We use litellm.integrations.custom_logger for this, more details about litellm custom callbacks here
Define your custom callback class in a python file.
Here's an example custom logger for tracking key, user, model, prompt, response, tokens, cost. We create a file called custom_callbacks.py and initialize proxy_handler_instance
from litellm.integrations.custom_logger import CustomLogger
import litellm

# This file includes the custom callbacks for LiteLLM Proxy
# Once defined, these can be passed in proxy_config.yaml
class MyCustomHandler(CustomLogger):
    def log_pre_api_call(self, model, messages, kwargs):
        print(f"Pre-API Call")

    def log_post_api_call(self, kwargs, response_obj, start_time, end_time):
        print(f"Post-API Call")

    def log_success_event(self, kwargs, response_obj, start_time, end_time):
        print("On Success")

    def log_failure_event(self, kwargs, response_obj, start_time, end_time):
        print(f"On Failure")

    async def async_log_success_event(self, kwargs, response_obj, start_time, end_time):
        print(f"On Async Success!")
        # log: key, user, model, prompt, response, tokens, cost
        # Access kwargs passed to litellm.completion()
        model = kwargs.get("model", None)
        messages = kwargs.get("messages", None)
        user = kwargs.get("user", None)

        # Access litellm_params passed to litellm.completion(), example access `metadata`
        litellm_params = kwargs.get("litellm_params", {})
        metadata = litellm_params.get("metadata", {})   # headers passed to LiteLLM proxy, can be found here

        # Calculate cost using  litellm.completion_cost()
        cost = litellm.completion_cost(completion_response=response_obj)
        response = response_obj
        # tokens used in response
        usage = response_obj["usage"]

        print(
            f"""
                Model: {model},
                Messages: {messages},
                User: {user},
                Usage: {usage},
                Cost: {cost},
                Response: {response}
                Proxy Metadata: {metadata}
            """
        )
        return

    async def async_log_failure_event(self, kwargs, response_obj, start_time, end_time):
        try:
            print(f"On Async Failure !")
            print("\nkwargs", kwargs)
            # Access kwargs passed to litellm.completion()
            model = kwargs.get("model", None)
            messages = kwargs.get("messages", None)
            user = kwargs.get("user", None)

            # Access litellm_params passed to litellm.completion(), example access `metadata`
            litellm_params = kwargs.get("litellm_params", {})
            metadata = litellm_params.get("metadata", {})   # headers passed to LiteLLM proxy, can be found here

            # Access Exceptions & Traceback
            exception_event = kwargs.get("exception", None)
            traceback_event = kwargs.get("traceback_exception", None)

            # Calculate cost using  litellm.completion_cost()
            cost = litellm.completion_cost(completion_response=response_obj)
            print("now checking response obj")

            print(
                f"""
                    Model: {model},
                    Messages: {messages},
                    User: {user},
                    Cost: {cost},
                    Response: {response_obj}
                    Proxy Metadata: {metadata}
                    Exception: {exception_event}
                    Traceback: {traceback_event}
                """
            )
        except Exception as e:
            print(f"Exception: {e}")

proxy_handler_instance = MyCustomHandler()

# Set litellm.callbacks = [proxy_handler_instance] on the proxy
Step 2 - Pass your custom callback class in config.yaml
We pass the custom callback class defined in Step1 to the config.yaml.
Set callbacks to python_filename.logger_instance_name
In the config below, we pass
- python_filename:
custom_callbacks.py - logger_instance_name:
proxy_handler_instance. This is defined in Step 1
callbacks: custom_callbacks.proxy_handler_instance
model_list:
  - model_name: gpt-3.5-turbo
    litellm_params:
      model: gpt-3.5-turbo

litellm_settings:
  callbacks: custom_callbacks.proxy_handler_instance # sets litellm.callbacks = [proxy_handler_instance]
Step 2b - Loading Custom Callbacks from S3/GCS (Alternative)
Instead of using local Python files, you can load custom callbacks directly from S3 or GCS buckets. This is useful for centralized callback management or when deploying in containerized environments.
URL Format:
- S3:
s3://bucket-name/module_name.instance_name - GCS:
gcs://bucket-name/module_name.instance_name
Example - Loading from S3:
Let's say you have a file custom_callbacks.py stored in your S3 bucket litellm-proxy with the following content:
# custom_callbacks.py (stored in S3)
from litellm.integrations.custom_logger import CustomLogger
import litellm

class MyCustomHandler(CustomLogger):
    async def async_log_success_event(self, kwargs, response_obj, start_time, end_time):
        print(f"Custom UI SSO callback executed!")
        # Your custom logic here

    async def async_log_failure_event(self, kwargs, response_obj, start_time, end_time):
        print(f"Custom UI SSO failure callback!")
        # Your failure handling logic

# Instance that will be loaded by LiteLLM
custom_handler = MyCustomHandler()
Configuration:
model_list:
  - model_name: gpt-3.5-turbo
    litellm_params:
      model: gpt-3.5-turbo

litellm_settings:
  callbacks: ["s3://litellm-proxy/custom_callbacks.custom_handler"]
Example - Loading from GCS:
model_list:
  - model_name: gpt-3.5-turbo
    litellm_params:
      model: gpt-3.5-turbo

litellm_settings:
  callbacks: ["gcs://my-gcs-bucket/custom_callbacks.custom_handler"]
How it works:
- LiteLLM detects the S3/GCS URL prefix
- Downloads the Python file to a temporary location
- Loads the module and extracts the specified instance
- Cleans up the temporary file
- Uses the callback instance for logging
This approach allows you to:
- Centrally manage callback files across multiple proxy instances
- Share callbacks across different environments
- Version control callback files in cloud storage
Step 2c - Mounting Custom Callbacks in Helm/Kubernetes (Alternative)
When deploying with Helm or Kubernetes, you can mount custom callback Python files alongside your config.yaml using subPath to avoid overwriting the config directory.
The Problem:
Mounting a volume to a directory (e.g., /app/) would normally hide all existing files in that directory, including your config.yaml.
The Solution:
Use subPath in your volumeMounts to mount individual files without overwriting the entire directory.
Example - Helm values.yaml:
# values.yaml
volumes:
  - name: callback-files
    configMap:
      name: litellm-callback-files

volumeMounts:
  - name: callback-files
    mountPath: /app/custom_callbacks.py  # Mount to specific FILE path
    subPath: custom_callbacks.py         # Required to avoid overwriting directory
Create the ConfigMap with your callback file:
apiVersion: v1
kind: ConfigMap
metadata:
  name: litellm-callback-files
data:
  custom_callbacks.py: |
    from litellm.integrations.custom_logger import CustomLogger

    class MyCustomHandler(CustomLogger):
        async def async_log_success_event(self, kwargs, response_obj, start_time, end_time):
            print(f"Success! Model: {kwargs.get('model')}")

    proxy_handler_instance = MyCustomHandler()
Reference in your config.yaml:
litellm_settings:
  callbacks: custom_callbacks.proxy_handler_instance
How it works:
- The
subPathparameter tells Kubernetes to mount only the specific file - This places
custom_callbacks.pyin/app/alongside your existingconfig.yaml - LiteLLM automatically finds the callback file in the same directory as the config
- No files are overwritten or hidden
Note: You can mount multiple callback files by adding more volumeMounts entries, each with its own subPath.
Step 3 - Start proxy + test request
litellm --config proxy_config.yaml
curl --location 'http://0.0.0.0:4000/chat/completions' \
    --header 'Authorization: Bearer sk-1234' \
    --data ' {
    "model": "gpt-3.5-turbo",
    "messages": [
        {
        "role": "user",
        "content": "good morning good sir"
        }
    ],
    "user": "ishaan-app",
    "temperature": 0.2
    }'
Resulting Log on Proxy
On Success
    Model: gpt-3.5-turbo,
    Messages: [{'role': 'user', 'content': 'good morning good sir'}],
    User: ishaan-app,
    Usage: {'completion_tokens': 10, 'prompt_tokens': 11, 'total_tokens': 21},
    Cost: 3.65e-05,
    Response: {'id': 'chatcmpl-8S8avKJ1aVBg941y5xzGMSKrYCMvN', 'choices': [{'finish_reason': 'stop', 'index': 0, 'message': {'content': 'Good morning! How can I assist you today?', 'role': 'assistant'}}], 'created': 1701716913, 'model': 'gpt-3.5-turbo-0613', 'object': 'chat.completion', 'system_fingerprint': None, 'usage': {'completion_tokens': 10, 'prompt_tokens': 11, 'total_tokens': 21}}
    Proxy Metadata: {'user_api_key': None, 'headers': Headers({'host': '0.0.0.0:4000', 'user-agent': 'curl/7.88.1', 'accept': '*/*', 'authorization': 'Bearer sk-1234', 'content-length': '199', 'content-type': 'application/x-www-form-urlencoded'}), 'model_group': 'gpt-3.5-turbo', 'deployment': 'gpt-3.5-turbo-ModelID-gpt-3.5-turbo'}
Logging Proxy Request Object, Header, Url
Here's how you can access the url, headers, request body sent to the proxy for each request
class MyCustomHandler(CustomLogger):
    async def async_log_success_event(self, kwargs, response_obj, start_time, end_time):
        print(f"On Async Success!")

        litellm_params = kwargs.get("litellm_params", None)
        proxy_server_request = litellm_params.get("proxy_server_request")
        print(proxy_server_request)
Expected Output
{
  "url": "http://testserver/chat/completions",
  "method": "POST",
  "headers": {
    "host": "testserver",
    "accept": "*/*",
    "accept-encoding": "gzip, deflate",
    "connection": "keep-alive",
    "user-agent": "testclient",
    "authorization": "Bearer None",
    "content-length": "105",
    "content-type": "application/json"
  },
  "body": {
    "model": "Azure OpenAI GPT-4 Canada",
    "messages": [
      {
        "role": "user",
        "content": "hi"
      }
    ],
    "max_tokens": 10
  }
}
Logging model_info set in config.yaml
Here is how to log the model_info set in your proxy config.yaml. Information on setting model_info on config.yaml
class MyCustomHandler(CustomLogger):
    async def async_log_success_event(self, kwargs, response_obj, start_time, end_time):
        print(f"On Async Success!")

        litellm_params = kwargs.get("litellm_params", None)
        model_info = litellm_params.get("model_info")
        print(model_info)
Expected Output
{'mode': 'embedding', 'input_cost_per_token': 0.002}
Logging responses from proxy
Both /chat/completions and /embeddings responses are available as response_obj
Note: for /chat/completions, both stream=True and non stream responses are available as response_obj
class MyCustomHandler(CustomLogger):
    async def async_log_success_event(self, kwargs, response_obj, start_time, end_time):
        print(f"On Async Success!")
        print(response_obj)
Expected Output /chat/completion [for both stream and non-stream responses]
ModelResponse(
    id='chatcmpl-8Tfu8GoMElwOZuj2JlHBhNHG01PPo',
    choices=[
        Choices(
            finish_reason='stop',
            index=0,
            message=Message(
                content='As an AI language model, I do not have a physical body and therefore do not possess any degree or educational qualifications. My knowledge and abilities come from the programming and algorithms that have been developed by my creators.',
                role='assistant'
            )
        )
    ],
    created=1702083284,
    model='chatgpt-v-2',
    object='chat.completion',
    system_fingerprint=None,
    usage=Usage(
        completion_tokens=42,
        prompt_tokens=5,
        total_tokens=47
    )
)
Expected Output /embeddings
{
    'model': 'ada',
    'data': [
        {
            'embedding': [
                -0.035126980394124985, -0.020624293014407158, -0.015343423001468182,
                -0.03980357199907303, -0.02750781551003456, 0.02111034281551838,
                -0.022069307044148445, -0.019442008808255196, -0.00955679826438427,
                -0.013143060728907585, 0.029583381488919258, -0.004725852981209755,
                -0.015198921784758568, -0.014069183729588985, 0.00897879246622324,
                0.01521205808967352,
                # ... (truncated for brevity)
            ]
        }
    ]
}
Custom Callback APIs [Async]
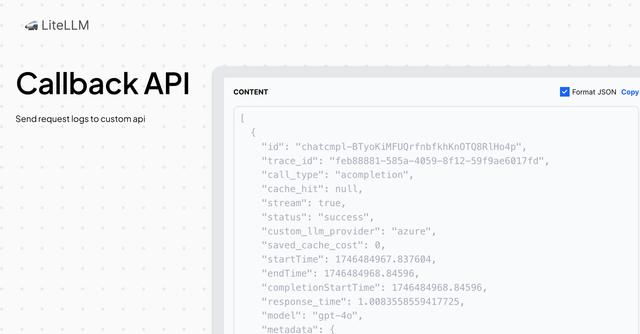
Send LiteLLM logs to a custom API endpoint
This is an Enterprise only feature Get Started with Enterprise here
| Property | Details |
|---|---|
| Description | Log LLM Input/Output to a custom API endpoint |
| Logged Payload | List[StandardLoggingPayload] LiteLLM logs a list of StandardLoggingPayload objects to your endpoint |
Use this if you:
- Want to use custom callbacks written in a non Python programming language
- Want your callbacks to run on a different microservice
Usage
- Set
success_callback: ["generic_api"]on litellm config.yaml
model_list:
  - model_name: openai/gpt-4o
    litellm_params:
      model: openai/gpt-4o
      api_key: os.environ/OPENAI_API_KEY

litellm_settings:
  success_callback: ["generic_api"]
- Set Environment Variables for the custom API endpoint
| Environment Variable | Details | Required |
|---|---|---|
GENERIC_LOGGER_ENDPOINT | The endpoint + route we should send callback logs to | Yes |
GENERIC_LOGGER_HEADERS | Optional: Set headers to be sent to the custom API endpoint | No, this is optional |
GENERIC_LOGGER_ENDPOINT="https://webhook-test.com/30343bc33591bc5e6dc44217ceae3e0a"


# Optional: Set headers to be sent to the custom API endpoint
GENERIC_LOGGER_HEADERS="Authorization=Bearer <your-api-key>"
# if multiple headers, separate by commas
GENERIC_LOGGER_HEADERS="Authorization=Bearer <your-api-key>,X-Custom-Header=custom-header-value"
- Start the proxy
litellm --config /path/to/config.yaml
- Make a test request
curl -i --location 'http://0.0.0.0:4000/chat/completions' \
    --header 'Content-Type: application/json' \
    --header 'Authorization: Bearer sk-1234' \
    --data '{
    "model": "openai/gpt-4o",
    "messages": [
        {
        "role": "user",
        "content": "what llm are you"
        }
    ]
}'
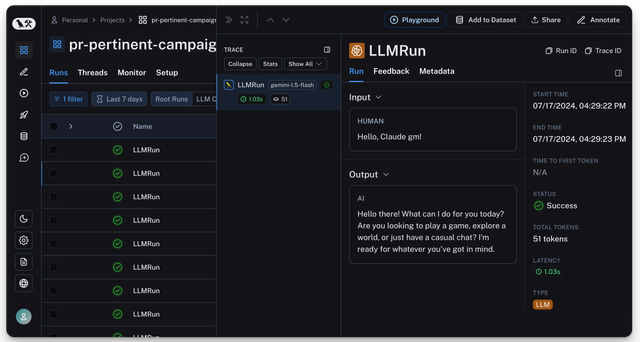
Langsmith
- Set
success_callback: ["langsmith"]on litellm config.yaml
If you're using a custom LangSmith instance, you can set the
LANGSMITH_BASE_URL environment variable to point to your instance.
litellm_settings:
  success_callback: ["langsmith"]

environment_variables:
  LANGSMITH_API_KEY: "lsv2_pt_xxxxxxxx"
  LANGSMITH_PROJECT: "litellm-proxy"

  LANGSMITH_BASE_URL: "https://api.smith.langchain.com" # (Optional - only needed if you have a custom Langsmith instance)
- Start Proxy
litellm --config /path/to/config.yaml
- Test it!
curl --location 'http://0.0.0.0:4000/chat/completions' \
--header 'Content-Type: application/json' \
--data ' {
      "model": "fake-openai-endpoint",
      "messages": [
        {
          "role": "user",
          "content": "Hello, Claude gm!"
        }
      ],
    }
'
Expect to see your log on Langfuse
Arize AI
- Set
success_callback: ["arize"]on litellm config.yaml
model_list:
  - model_name: gpt-4
    litellm_params:
      model: openai/fake
      api_key: fake-key
      api_base: https://exampleopenaiendpoint-production.up.railway.app/

litellm_settings:
  callbacks: ["arize"]

environment_variables:
    ARIZE_SPACE_KEY: "d0*****"
    ARIZE_API_KEY: "141a****"
    ARIZE_ENDPOINT: "https://otlp.arize.com/v1" # OPTIONAL - your custom arize GRPC api endpoint
    ARIZE_HTTP_ENDPOINT: "https://otlp.arize.com/v1" # OPTIONAL - your custom arize HTTP api endpoint. Set either this or ARIZE_ENDPOINT
- Start Proxy
litellm --config /path/to/config.yaml
- Test it!
curl --location 'http://0.0.0.0:4000/chat/completions' \
--header 'Content-Type: application/json' \
--data ' {
      "model": "fake-openai-endpoint",
      "messages": [
        {
          "role": "user",
          "content": "Hello, Claude gm!"
        }
      ],
    }
'
Expect to see your log on Langfuse
Langtrace
- Set
success_callback: ["langtrace"]on litellm config.yaml
model_list:
  - model_name: gpt-4
    litellm_params:
      model: openai/fake
      api_key: fake-key
      api_base: https://exampleopenaiendpoint-production.up.railway.app/

litellm_settings:
  callbacks: ["langtrace"]

environment_variables:
    LANGTRACE_API_KEY: "141a****"
- Start Proxy
litellm --config /path/to/config.yaml
- Test it!
curl --location 'http://0.0.0.0:4000/chat/completions' \
--header 'Content-Type: application/json' \
--data ' {
      "model": "fake-openai-endpoint",
      "messages": [
        {
          "role": "user",
          "content": "Hello, Claude gm!"
        }
      ],
    }
'
Galileo
[BETA]
Log LLM I/O on www.rungalileo.io
Beta Integration
Required Env Variables
Galileo Cloud (app.galileo.ai):
export GALILEO_API_KEY=""
export GALILEO_PROJECT_ID=""
export GALILEO_LOG_STREAM_ID=""  # optional
export GALILEO_BASE_URL="https://api.galileo.ai"  # optional, defaults when GALILEO_API_KEY is set
Enterprise / self-hosted Observe:
export GALILEO_BASE_URL=""  # Replace 'console' with 'api' in your console URL (e.g. https://api.galileo.myenterprise.com)
export GALILEO_PROJECT_ID=""
export GALILEO_USERNAME=""
export GALILEO_PASSWORD=""
Quick Start
- Add to Config.yaml
model_list:
- litellm_params:
    api_base: https://exampleopenaiendpoint-production.up.railway.app/
    api_key: my-fake-key
    model: openai/my-fake-model
  model_name: fake-openai-endpoint

environment_variables:
  GALILEO_API_KEY: "os.environ/GALILEO_API_KEY"
  GALILEO_PROJECT_ID: "your-project-id"
  GALILEO_LOG_STREAM_ID: "your-log-stream-id"  # optional

litellm_settings:
  success_callback: ["galileo"] # 👈 KEY CHANGE
- Start Proxy
litellm --config /path/to/config.yaml
- Test it!
curl --location 'http://0.0.0.0:4000/chat/completions' \
--header 'Content-Type: application/json' \
--data ' {
      "model": "fake-openai-endpoint",
      "messages": [
        {
          "role": "user",
          "content": "what llm are you"
        }
      ],
    }
'
🎉 That's it - Expect to see your Logs on your Galileo Dashboard
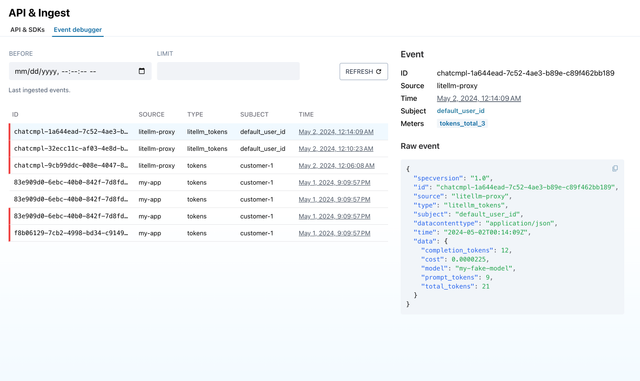
OpenMeter
Bill customers according to their LLM API usage with OpenMeter
Required Env Variables
# from https://openmeter.cloud
export OPENMETER_API_ENDPOINT="" # defaults to https://openmeter.cloud
export OPENMETER_API_KEY=""
Quick Start
- Add to Config.yaml
model_list:
- litellm_params:
    api_base: https://openai-function-calling-workers.tasslexyz.workers.dev/
    api_key: my-fake-key
    model: openai/my-fake-model
  model_name: fake-openai-endpoint

litellm_settings:
  success_callback: ["openmeter"] # 👈 KEY CHANGE
- Start Proxy
litellm --config /path/to/config.yaml
- Test it!
curl --location 'http://0.0.0.0:4000/chat/completions' \
--header 'Content-Type: application/json' \
--data ' {
      "model": "fake-openai-endpoint",
      "messages": [
        {
          "role": "user",
          "content": "what llm are you"
        }
      ],
    }
'
DynamoDB
We will use the --config to set
litellm.success_callback = ["dynamodb"]litellm.dynamodb_table_name = "your-table-name"
This will log all successful LLM calls to DynamoDB
Step 1 Set AWS Credentials in .env
AWS_ACCESS_KEY_ID = ""
AWS_SECRET_ACCESS_KEY = ""
AWS_REGION_NAME = ""
Step 2: Create a config.yaml file and set litellm_settings: success_callback
model_list:
 - model_name: gpt-3.5-turbo
    litellm_params:
      model: gpt-3.5-turbo
litellm_settings:
  success_callback: ["dynamodb"]
  dynamodb_table_name: your-table-name
Step 3: Start the proxy, make a test request
Start proxy
litellm --config config.yaml --debug
Test Request
curl --location 'http://0.0.0.0:4000/chat/completions' \
    --header 'Content-Type: application/json' \
    --data ' {
    "model": "Azure OpenAI GPT-4 East",
    "messages": [
        {
        "role": "user",
        "content": "what llm are you"
        }
    ]
    }'
Your logs should be available on DynamoDB
Data Logged to DynamoDB /chat/completions
{
  "id": {
    "S": "chatcmpl-8W15J4480a3fAQ1yQaMgtsKJAicen"
  },
  "call_type": {
    "S": "acompletion"
  },
  "endTime": {
    "S": "2023-12-15 17:25:58.424118"
  },
  "messages": {
    "S": "[{'role': 'user', 'content': 'This is a test'}]"
  },
  "metadata": {
    "S": "{}"
  },
  "model": {
    "S": "gpt-3.5-turbo"
  },
  "modelParameters": {
    "S": "{'temperature': 0.7, 'max_tokens': 100, 'user': 'ishaan-2'}"
  },
  "response": {
    "S": "ModelResponse(id='chatcmpl-8W15J4480a3fAQ1yQaMgtsKJAicen', choices=[Choices(finish_reason='stop', index=0, message=Message(content='Great! What can I assist you with?', role='assistant'))], created=1702641357, model='gpt-3.5-turbo-0613', object='chat.completion', system_fingerprint=None, usage=Usage(completion_tokens=9, prompt_tokens=11, total_tokens=20))"
  },
  "startTime": {
    "S": "2023-12-15 17:25:56.047035"
  },
  "usage": {
    "S": "Usage(completion_tokens=9, prompt_tokens=11, total_tokens=20)"
  },
  "user": {
    "S": "ishaan-2"
  }
}
Data logged to DynamoDB /embeddings
{
  "id": {
    "S": "4dec8d4d-4817-472d-9fc6-c7a6153eb2ca"
  },
  "call_type": {
    "S": "aembedding"
  },
  "endTime": {
    "S": "2023-12-15 17:25:59.890261"
  },
  "messages": {
    "S": "['hi']"
  },
  "metadata": {
    "S": "{}"
  },
  "model": {
    "S": "text-embedding-ada-002"
  },
  "modelParameters": {
    "S": "{'user': 'ishaan-2'}"
  },
  "response": {
    "S": "EmbeddingResponse(model='text-embedding-ada-002-v2', data=[{'embedding': [-0.03503197431564331, -0.020601635798811913, -0.015375726856291294,
  }
}
Sentry
If api calls fail (llm/database) you can log those to Sentry:
Step 1 Install Sentry
uv add --upgrade sentry-sdk
Step 2: Save your Sentry_DSN and add litellm_settings: failure_callback
export SENTRY_DSN="your-sentry-dsn"
# Optional: Configure Sentry sampling rates
export SENTRY_API_SAMPLE_RATE="1.0"  # Controls what percentage of errors are sent (default: 1.0 = 100%)
export SENTRY_API_TRACE_RATE="1.0"   # Controls what percentage of transactions are sampled for performance monitoring (default: 1.0 = 100%)
export SENTRY_ENVIRONMENT="development" # Controls the Sentry Environment (default: production)
model_list:
 - model_name: gpt-3.5-turbo
    litellm_params:
      model: gpt-3.5-turbo
litellm_settings:
  # other settings
  failure_callback: ["sentry"]
general_settings:
  database_url: "my-bad-url" # set a fake url to trigger a sentry exception
Step 3: Start the proxy, make a test request
Start proxy
litellm --config config.yaml --debug
Test Request
litellm --test
Athina
Athina allows you to log LLM Input/Output for monitoring, analytics, and observability.
We will use the --config to set litellm.success_callback = ["athina"] this will log all successful LLM calls to athina
Step 1 Set Athina API key
ATHINA_API_KEY = "your-athina-api-key"
Step 2: Create a config.yaml file and set litellm_settings: success_callback
model_list:
  - model_name: gpt-3.5-turbo
    litellm_params:
      model: gpt-3.5-turbo
litellm_settings:
  success_callback: ["athina"]
Step 3: Start the proxy, make a test request
Start proxy
litellm --config config.yaml --debug
Test Request
curl --location 'http://0.0.0.0:4000/chat/completions' \
    --header 'Content-Type: application/json' \
    --data ' {
    "model": "gpt-3.5-turbo",
    "messages": [
        {
        "role": "user",
        "content": "which llm are you"
        }
    ]
    }'